That plastic panel at the base of your windshield doesn’t get much attention until it’s cracked, warped, or missing half its clips. The wiper cowl grille shields the wiper linkage from debris, channels rainwater away from the firewall, and pulls fresh air into the cabin HVAC system. When it goes wrong, all three functions suffer. The good news is that learning how to replace the wiper cowl grille is one of the more satisfying DIY jobs on a car. It typically takes under two hours and doesn’t require anything beyond basic hand tools.
How to Replace the Wiper Cowl Grille: Step-by-Step
The process is consistent across most cars and light trucks. The main variables are whether the cowl is one piece or two separate inserts and how the wiper arms attach at the pivot posts.
What You’ll Need
- Trim panel removal tool or a tape-wrapped flat screwdriver
- Socket set (10mm and 13mm covers most applications) with a ratchet
- Wiper arm puller, helpful on arms that’ve been on for years
- A microfiber towel to lay over the glass while you work
- Replacement cowl grille, confirmed for your year, make, and model
- Spare push-pin retainer clips in case any originals break on removal
Tip: Check whether your vehicle uses a single-piece cowl or a left/right insert pair before ordering. Some Ford and GM trucks use two inserts. If you’re replacing the full assembly, you’ll need both.
Removal and Installation
- Open the hood and prop it securely.
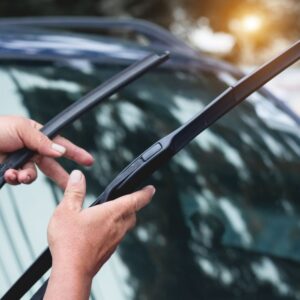
- Pop the caps at the base of each wiper arm and remove the retaining nuts with a socket wrench.
- Mark each arm’s position on the glass with tape or a grease pencil before pulling them off.
- Rock the arms gently off the splined pivot posts. Lay a folded microfiber towel on the glass in case an arm springs back.
- Remove the push-pin retainers or screws along the front edge and near both fenders. Count them so none get left behind.
- Slide the cowl grille toward the windshield to free the rear lip from the track at the glass base, then lift the panel clear.
- Clean out the cowl tray before the new grille goes in. Packed leaf litter and dirt are usually the reason water ends up on the passenger floor.
- Seat the rear lip of the new grille into the windshield track first, then press the front edge down until the clips engage.
- Reinstall fasteners from the center outward to keep the panel from warping.
- Reattach the wiper arms at their marked positions, torque the nuts to spec (15 to 25 ft-lbs on most vehicles), and snap the caps back on.
Warning: Don’t use a pry tool or screwdriver to force the rear lip into the windshield track. That track is fragile on a lot of vehicles. Use hand pressure only, and work from one end to the other gradually.
How Do You Know the Cowl Grille Needs Replacing?
A failing cowl grille tends to show up in ways that get misdiagnosed at first. Water on the passenger floor after rain is a common one. Most people blame the door seals or the windshield, but if the cowl tray’s drain channels are blocked or the grille has lifted at the edges, that’s where the water’s coming from.
Visible cracks along the mounting tabs or the spine of the panel are the clearest sign it’s time. UV exposure and heat cycling make the plastic brittle over time. Once a clip tab snaps, the panel starts to float at the corners and gaps open up.
Weak airflow through the cabin vents is another one that’s easy to misread. The cowl vent serves as the fresh air intake for the HVAC system. A collapsed or clogged grille cuts that intake down and makes the blower work harder than it should.
Note: A whistling sound near the base of the windshield at highway speed usually points to a loose cowl edge rather than a failing window seal. Press down on the panel while the car’s parked and see if any section flexes or lifts.
Is OEM or Aftermarket the Better Pick for a Cowl Grille?
Because the cowl grille has to maintain contact with the windshield glass track, fitment tolerance matters more here than it does on most other trim pieces. That said, aftermarket options have come a long way and are a solid choice for this job.
OEM parts guarantee an exact match to the original clip pattern, sealing strip, and plastic spec. The downside is price. Dealer-sourced cowl grilles for domestic trucks can run well over a hundred dollars per side.
Quality aftermarket cowl grilles deliver reliable fitment at a better price point. Brands like Replacement, available through CarParts.com, use direct-fit engineering designed to seat correctly without modification. Their windshield cowl vent grilles start around $58 and cover a wide range of makes and models, which makes it easy to find a part that drops right in.
Buy carefully: Watch out for listings that claim fitment across a wide range of years without specifying submodel or trim. If the clip pattern doesn’t match your vehicle exactly, the grille won’t sit flush at the windshield track, and you’ll end up with the same leak you started with. Always cross-reference the part number against your VIN before ordering.
Finding the Right Cowl Grille Online
Ordering online is a much better deal than the dealer parts counter, and CarParts.com makes it easy to filter by year, make, model, and submodel so you’re not guessing. Every listing includes the OEM part number it replaces, which is the fastest way to confirm you’ve got the right fit.
Before you add anything to the cart, verify a few things:
- The listing specifies left-side, right-side, or full assembly to match your setup
- The OEM replacement number in the listing matches your factory part number
- Clip hardware is included or listed separately, so you can add it
- There’s a return window in case something doesn’t fit as expected
Skip this: Don’t order based on the photo alone. A lot of cowl grilles look nearly identical across model years but differ in clip placement, panel width, or how the rear lip is shaped. Always verify the part number first.
Most orders ship within a day or two and arrive with the panel edges protected. Check for any damage before tossing the box.
Maintenance That Keeps Your Cowl Grille Going Longer
Once the new grille is in, keep the underlying tray clear, and it’ll last. Leaf litter and pine needles pack into the cowl tray faster than you’d expect, especially in the fall. That debris holds moisture against the plastic and eventually blocks the drain tubes that route water out toward the lower fenders.
A quick flush with a garden hose twice a year is all it takes. While you’re at it, confirm water’s exiting through the side drain holes rather than pooling in the center. If it pools, there’s a clog in the drain tube worth clearing with a flexible wire or a short blast from an air nozzle. If the wiper motor area stays dry, you’re in good shape.
Tip: Hit the cowl grille with a UV protectant spray when you’re treating the rest of your exterior trim. The panel sits in a spot that catches direct sun and reflected heat off the glass, which wears the plastic faster than most other trim locations.
Skip the pressure washer on this area. Normal rainfall doesn’t push water past the cowl seals, but a pressure washer will. A standard garden hose with moderate flow handles the job without the risk. If you’re unsure whether your wiper system needs more attention, the CarParts.com blog covers wiper motor replacement and how windshield wipers work in detail.
Keeping the cowl grille in good shape is one of those maintenance items that pays off well beyond what it costs. When it’s time to replace your wiper blades or tackle the cowl while you’re at it, CarParts.com has a solid selection of direct-fit cowl grilles at prices that make DIY the easy call. Search by your vehicle’s year, make, and model to find the right part and get it on the way.
Keep Reading: Related Posts


Any information provided on this Website is for informational purposes only and is not intended to replace consultation with a professional mechanic. The accuracy and timeliness of the information may change from the time of publication.