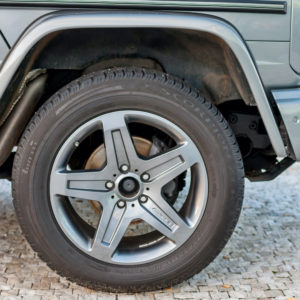
You can technically drive without a wheel well liner, but doing so puts your vehicle at real risk the longer you go without one. The liner is not a structural component, so the car will steer and stop normally, but exposed components in the wheel well become vulnerable to debris, water, and corrosive road salt with every mile you drive.
Is It Safe to Drive Without a Wheel Well Liner?
Driving without a wheel well liner is not immediately dangerous to the driver, but it creates conditions for accelerated and sometimes expensive damage. How severe that damage becomes depends on your driving environment, how long the liner has been missing, and where your manufacturer routed wiring or mounted sensitive electronics near that wheel well.
Short trips on dry pavement carry minimal immediate risk. Regular driving in wet weather or on salted roads, however, turns that open wheel well into a direct pathway for damage that compounds over time.
| Driving Condition | Risk Level | Primary Concern |
| Dry roads, short trips | Low | Minor debris contact |
| Highway driving | Moderate | High-velocity rock strikes |
| Rain or wet roads | High | Water intrusion to wiring |
| Salted winter roads | Very High | Rapid rust and corrosion |
| Off-road or gravel | Very High | Debris impact on components |
What Is a Wheel Well Liner and What Does It Protect?
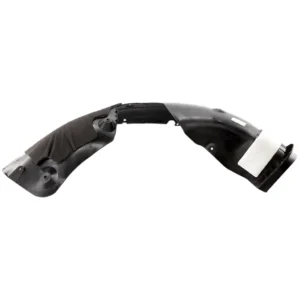
A wheel well liner, also called a fender liner or inner fender, is a molded plastic panel fitted inside each wheel arch. It sits between the rotating tire and the vehicle body, covering sheet metal, wiring harnesses, and in some cases critical electronics that would otherwise be directly exposed to the road.
The liner shields those areas from road spray, gravel, mud, and salt. It also contributes to aerodynamic flow through the wheel well and reduces road noise inside the cabin. On some vehicles it creates an intentional air channel that routes fresh air to the engine intake or helps cool brake components. Losing a liner is not just a cosmetic issue.
Pro Tips are nuggets of information direct from ASE-certified automobile technicians working with CarParts.com, which may include unique, personal insights based on their years of experience working in the automotive industry. These can help you make more informed decisions about your car.
Pro Tip: The most dynamic element the wheel well liner protects on most vehicles is the belt and pulley system; you may lose power steering and see an alternator light when you run through a puddle if you're driving without a wheel well liner on that side of the vehicle.
What Is Actually at Risk When the Liner Is Missing
How important a wheel well liner is becomes clear when you look at what sits directly behind it. On many vehicles, the wiring harness running to the headlights, turn signals, and ABS sensors enters the cabin through a grommet located in or near the wheel well. Water and salt intrusion at that grommet corrodes connectors and causes electrical failures that are expensive to diagnose and repair.
On some vehicles, control modules and other electronics are mounted close to the front wheel well with the liner acting as an important splash barrier. As mentioned earlier, if accessory drive belts or pulleys are positioned near that opening, debris kicked up by the tire can cause belt slip, premature bearing wear, or a belt failure at the worst possible time.
Beyond electronics, bare sheet metal in the wheel well will begin rusting almost immediately when exposed to road salt. Fender rot can progress enough to require panel replacement in under a year on a daily driver in a northern or coastal climate. By the time corrosion is visible from the outside, the damage beneath the surface is already well advanced.
Do You Need to Replace It Right Away?
Whether you need a wheel well liner replaced urgently depends on your region and how the vehicle is used. In the salt belt during winter, replacement is not optional. Exposed metal and wiring degrade in weeks, not months, and the cost of waiting climbs fast.
In a dry climate with occasional dust and light gravel, a short delay is acceptable, but the liner should go back on before conditions change. Also worth knowing: a missing liner can become a compliance or roadworthiness issue if it leaves loose parts, protrusions, or inadequate wheel-well protection.
- Salt belt or winter driving: Replace within days, not weeks
- Rain-heavy climate: Replace within two to four weeks
- Dry climate, short trips only: Replace at your earliest opportunity
- Exposed electronics or intake nearby: Replace immediately, regardless of weather
Warning: Do not wait until you see rust to act. Corrosion behind the wheel well liner starts from the inside out and is often invisible until the panel is gone.
How Much Does Wheel Well Liner Replacement Cost?
Aftermarket wheel well liners generally run between $40 and $100 per side for common vehicles. OEM parts range from $160 to $280 depending on make and model, and trucks like the F-150 and Silverado tend to sit at the higher end because of their size and mounting complexity. Professional installation adds roughly $80 to $150 in labor per side, since the job typically requires lifting the vehicle and pulling the wheel. But you can install them yourself if you’re patient. Just make sure you put in all the retainers and that they’re the right size.
For most passenger cars and crossovers, a DIY replacement comes in well under $150 in parts and takes one to two hours per side. That is a straightforward trade compared to the cost of replacing a rusted fender or repairing water-damaged wiring. Salvage yards are worth checking for late-model vehicles, since plastic liners from wrecked cars are often completely intact. When sourcing a used liner, confirm it is from the correct side, as mounting point locations differ.
How to Fix a Ripped Wheel Well Liner
If the liner is torn but still mounted, the right move is a full replacement rather than an indefinite patch. For a temporary fix while you source a part, plastic repair rivets, sometimes called drift stitches, can stabilize a split liner and keep debris out. Either way, here is how a full replacement goes.
Tools needed:
- Floor jack and jack stands
- Lug wrench
- Phillips and Torx screwdrivers (T15, T20, T25 cover most applications)
- Trim clip removal tool or wide flat pry bar
- Replacement liner and a full set of new plastic push-pin clips
Replacement steps:
- Lift the vehicle and remove the wheel on the affected side to fully expose the wheel well.
- Locate all fasteners around the liner perimeter, including any hidden behind the bumper cover or tucked under the splash shield.
- Remove the fasteners and pull the liner out, setting aside any clips that are undamaged. It’s actually best to spring for all new retainers. There are assortments available online that aren’t as expensive as buying the retainers at parts stores, just make sure you get the right size and type.
- Clean the wheel well before the new liner goes in, removing any salt deposits or early rust with a wire brush and rust inhibitor spray.
- Align the new liner with all mounting holes and press the push-pin clips in firmly until each one seats with a click.
- Reinstall the wheel, torque the lug nuts to the vehicle’s specification, and lower the car.
Tip: Photograph the old liner before pulling it out. The photo makes it much easier to confirm correct orientation on the new part before you commit the clips.
Warning: Never reuse cracked or bent clips. A liner that is not fully seated will rattle at highway speed, flex away from the body, and in some cases contact the tire during cornering.
Keep Reading: Related Posts


Any information provided on this Website is for informational purposes only and is not intended to replace consultation with a professional mechanic. The accuracy and timeliness of the information may change from the time of publication.