Emergency braking is necessary to keep the vehicle from rolling when parked on an up or downhill slope.
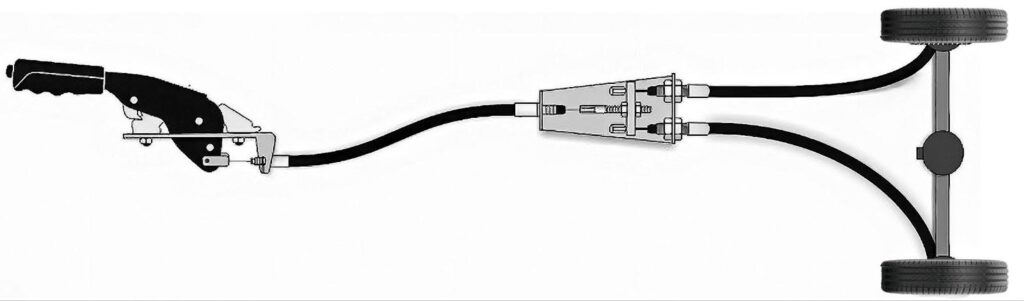
The emergency or parking brake is a secondary mechanical brake system that can be electrically activated or cable activated. The cable type parking brake consists of a steel cable connected to a lever between the seats or a pedal on the left side of the driver’s foot well that evenly applies tension to two other cables leading to each rear wheel to either apply the existing brake shoes or pads or to apply a secondary set of shoes within the “rotor hat.” These are only designed to keep the car from rolling when parked, but they can also be used in a limited way for emergency stops if the service brakes fail.
Pro Tips are nuggets of information direct from ASE-certified automobile technicians working with CarParts.com, which may include unique, personal insights based on their years of experience working in the automotive industry. These can help you make more informed decisions about your car.
Pro Tip: Sometimes relying on the park position in an automatic transmission can cause the vehicle to be hard to get out of park when it’s parked on a hill, so in those cases, apply the park brake before putting the transmission in park.
How Do Parking Brake Cables Work?
The cables pass through flexible woven metal tubes anchored at each end so that the cable passing through the tube will slide within the tubes, which are externally coated with plastic. Over time, the plastic protective coating can be breached so that water and road salt rust can build up in the tubes, fouling the cables. This can cause emergency brake cables to get stuck so that they fail to release after being applied or they may make the park brakes hard to engage.
Driving a car with a bad emergency brake system could be damaging to other related parts and could result in more repair costs for you in the future.
Step-by-Step Guide on How to Attach Emergency Brake Cables
The good news is you can actually do an emergency brake repair on your own if yours is already bad. Note, however, that changing the cables can require mechanical savvy, and it can be a difficult job, so be careful not to get in over your head.
Aside from wearing protective gear such as safety glasses and gloves, you will need the following tools during repair:
- Brake service retractor set
- Brake service tool set
- Drum brake service tool set
- Floor jack
- Jack stands
- Lug wrench
- Parking brake cable release tool
- Push pin pliers
- Torque wrench
Emergency brake repair varies depending on your vehicle so always refer to the vehicle’s service manual. Visit CarParts.com for high-quality replacement emergency brake cables.
Step 1: Secure the vehicle on an even surface and chock it to prevent from moving away.
Step 2: Engage the emergency brake.
Step 3: Disconnect the rear emergency brake cable and front cable from the equalizer bar and mark the cables connected to the chassis.
Step 4: Remove other supporting fasteners from the vehicle’s body to access the bottom part of the wheel assembly.
Step 5: Disconnect the front cable from the pivot hole enabling you to remove the front cable from the wheel assembly.
Step 6: Raise the vehicle and use jack stands to support it, then remove the wheel and tire.
Step 7: Remove the brake drum from the wheel hub to access the wheel drum assembly. Pull out the disc brake and caliper from the rear disc brake assembly.
Step 8: Disconnect the emergency brake cable from the lever attached to the brake shoe on the wheel side of the backing plate then pull the emergency brake cable through it.
Step 9: Get the new cables and install them by sliding the rear cable through the backing plate then attach them to the emergency brake lever.
Step 10: Put the brake drum and brake disc assembly back to their original location. Attach the wheel and tire.
Step 11: Lower the vehicle and torque the lug nuts to 100 ft. lbs.
Step 12: Connect the rear cables to the equalizer and properly route them to the chassis. Connect the front cable to the equalizer after.
Step 13: Place the parking brake in its original position and remove the pin from the parking brake control assembly.
Step 14: Engage and disengage the parking brake a few times to ensure it catches.
Where to Get New Parking Brake Cables for Your Vehicle
Safety should always be your priority when driving, and having damaged parking brake cables simply won’t do you any good.
Damaged or worn-out brake parts should be replaced as soon as possible, and you can get what you need in no time when you shop at CarParts.com.
Thanks to our strategically located warehouses across the US, you can get your new parking brake cable delivered to your doorstep in as fast as two business days.
Take your pick from a wide selection of parking brake cables sourced from only the most trusted manufacturers today. All our brake cables passed stringent testing procedures, so you’re sure to get one that’s built to last.
Enter your ride’s year, make, and model into our vehicle selector to start shopping for a direct-fit parking brake cable. Enjoy a hassle-free shopping experience when you use our search filters, and find a brake cable according to your preferred brand, price range, quantity, and more.
Pair up a high-quality product with an affordable price tag when you shop from us. All our parts come with a lifetime replacement and low-price guarantee, helping to get the best value for your money.
Shop now!
Keep Reading: Related Posts


Any information provided on this Website is for informational purposes only and is not intended to replace consultation with a professional mechanic. The accuracy and timeliness of the information may change from the time of publication.