Most drivers expect to pop the nut, lift the arm, and be done in five minutes. Then the arm refuses to move, the pivot post rusts to the base, and a simple job turns into an expensive repair. Knowing how to remove a windshield wiper arm correctly and what to do when it seizes keeps that five-minute task from becoming a visit to the shop.
What Tools Do You Need Before Starting?
Gather everything before touching the arm. Having the wrong socket size mid-job leads to rushed improvisation and stripped nuts.
- Socket wrench with 10mm, 13mm, or 15mm sockets (check your vehicle’s spec)
- Flathead screwdriver or trim pry tool
- Penetrating oil (PB Blaster or WD-40)
- Wiper arm puller tool
- Painter’s tape or wax crayon
- Wire brush or 400-grit sandpaper
- Ratchet extension for deep-set nuts
- Clean shop rag or microfiber cloth
Note: A wiper arm puller tool is not optional on older vehicles or any car driven through heavy rain and road salt. Corrosion between the steel spindle and the aluminum arm base creates a galvanic bond that manual rocking cannot break safely.
How to Remove a Windshield Wiper Arm
Before removing anything, park on a flat surface and turn the wipers off. Many vehicles have a service or maintenance mode that parks the arms vertically for easier access. Check the owner’s manual for this feature first.
1. Mark the arm’s resting position on the windshield glass using a small strip of painter’s tape or a wax crayon. This reference point ensures correct alignment when installing a replacement arm.
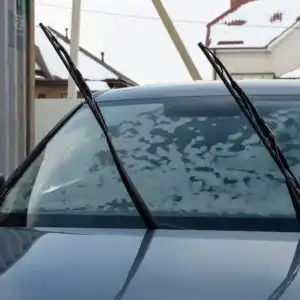
2. Lift the wiper arm away from the windshield until it locks into the service position. It should stand upright under its own spring tension.
3. Place a folded shop rag under the tip of the arm. If the arm snaps back down during removal, the rag prevents the blade stud from cracking the glass.
4. Locate the plastic cap at the base of the arm where it meets the pivot post. Pry it off with a flathead screwdriver.
5. Identify the correct socket size for the retaining nut. Set the ratchet to counterclockwise, stabilize the arm with your free hand, and loosen the nut. Do not remove it completely yet.
6. Back the nut off until it sits flush with the top of the post. Leave it in place. This position protects the splined shaft threads if the arm suddenly releases and jumps upward.
7. Rock the arm gently side to side while applying upward pressure. Many arms release at this point.
8. If the arm does not release, remove the nut fully and apply penetrating oil around the base of the arm where it contacts the splined post. Let it soak for at least 15 to 30 minutes. Reapply once more and wait again for severe corrosion.
9. Attempt rocking again after the soak. If the arm still holds, position a wiper arm puller with its jaws hooked under the arm base and the center screw pressing against the spindle post. Tighten the screw slowly and steadily until the arm releases.
10. Set the removed arm aside on a clean surface. Inspect both the arm and the splined post before proceeding.
Warning: Never use a flathead screwdriver or pry bar directly against the plastic windshield cowl. Cracking the cowl means an additional parts cost and a more involved repair.
What If the Wiper Arm Is Still Stuck?
A seized arm that resists even a puller tool signals severe galvanic corrosion. This electrochemical reaction between dissimilar metals fuses the arm to the steel spindle at a microscopic level, creating a bond stronger than surface rust alone.
For arms stuck beyond standard puller force:
- Apply heat using a heat gun on a low setting around the base of the arm for 30 to 60 seconds. The slight thermal expansion can break the bond. Keep the heat away from the windshield glass and wiper motor wiring.
- Re-soak with penetrating oil after heating and wait another 15 minutes before applying the puller again.
- As a last resort, a rotary cutting tool with a thin cutting wheel can score the base of the arm to release it. This destroys the arm but preserves the spindle and cowl. Use this method only when the arm is already confirmed damaged beyond reuse.
Tip: On vehicles older than 10 years, or any car regularly exposed to coastal air or winter road salt, soak the pivot base with penetrating oil the night before the job. An overnight soak wicks into corrosion gaps more effectively than a short-term application.
How Do Wiper Arm Types Affect the Removal Process?
Not every arm uses a retaining nut over a splined post. Identifying the attachment type first prevents the frustration of hunting for a nut that does not exist. For an overview of how each part of the system works together, see windshield wipers explained.
- Splined nut-type arms: The most common design on passenger cars and trucks. A single nut secures the arm over a tapered, splined shaft. Follow the full step-by-step process above.
- Pin-type arms: Found on some older domestic vehicles. A small retaining pin or clip holds the arm on the post. Remove the pin with needle-nose pliers before attempting to lift the arm.
- Bayonet or push-tab arms: Common on rear wipers and some European models. Press and hold a release tab at the base while pulling the arm upward. No tools are needed for this type.
- Side-pin arms: A spring-loaded pin locks into a groove on the spindle. Depress the pin with a small pick tool while pulling up.
Note: Rear wiper arms on hatchbacks and SUVs often use a bayonet or push-tab design. Check the rear arm before assuming it uses the same method as the front arms.
How Do You Check Fitment Before Buying a Replacement Arm?
Wiper arms are not universal. Two arms that look identical from a distance can differ in spline count, attachment angle, arm length, and internal curvature. Installing a mismatched arm results in incomplete blade coverage, mechanical interference with the hood or cowl, or a loose connection that causes the wiper blade to skip across the glass.
Run these checks before ordering a replacement:
- Confirm the vehicle’s year, make, model, and submodel. Trim levels sometimes affect wiper specifications.
- Count the splines on the exposed spindle post. The replacement arm’s internal spline count must match exactly.
- Measure the original arm from the pivot base to the blade attachment point. Driver-side and passenger-side arms are almost never the same length.
- Note the attachment style. A splined nut arm cannot replace a pin-type arm and vice versa.
- Verify the mounting angle. Arms are shaped for specific windshield contours and are often not interchangeable side-to-side.
Where Can You Buy a Replacement Arm and What Offers the Best Value?
Online retailers offer the widest selection with the lowest prices, and most legitimate parts sites let the vehicle’s year, make, and model drive the search results automatically. This vehicle-specific filtering removes most of the guesswork around fitment.
CarParts.com carries a broad range of OE-grade wiper arm replacements from trusted manufacturers across hundreds of makes and models. The site filters results by vehicle, which reduces the risk of ordering an incompatible part. Prices start around $14 for a direct replacement arm, which is significantly less than dealer pricing for the same specification.
When shopping online, look for these value indicators:
- Listings that display the exact OEM part number or an explicit cross-reference number
- Customer reviews that confirm fit on the same year and trim as the target vehicle
- A return window of at least 30 days in case an arm ships with a fitment issue
- Availability of both driver-side and passenger-side arms from the same manufacturer
If one arm is visibly damaged but the other looks intact, inspect the intact arm’s spring tension and pivot condition before skipping the second arm. Replacing both at the same time ensures even blade pressure across the entire windshield and avoids a second removal job within a short time frame. For more on keeping wiper blades performing well, a fresh set should go on once the new arms are seated.
How Do You Reinstall and Align the New Arm Correctly?
Clean the splined post with a wire brush or 400-grit sandpaper before sliding on the new arm. Apply a thin layer of anti-seize compound or water-resistant lithium grease to the splines. This step directly prevents the galvanic corrosion that caused the removal difficulty in the first place.
1. Align the new arm with the painter’s tape mark on the windshield glass before seating it on the spindle.
2. Press the arm down firmly onto the splines until it seats fully. The arm should not shift when you attempt to rock it by hand.
3. Thread the retaining nut by hand first, then tighten with the ratchet until snug. Do not overtighten. Applying too much torque cracks plastic arm bases and can damage the motor linkage connection below.
4. Snap the plastic cap back over the nut.
5. Lower the arm onto the windshield and test the wipers through a full cycle. Watch for any contact with the cowl at the bottom of the sweep or hood clearance at the top.
Tip: Run the washer fluid and watch for streaking or skipping on the first cycle. Both indicate the arm sits at the wrong angle or the blade is not seating flush against the glass. If streaking persists after repositioning the arm, see why wipers skip on glass for additional fixes.
Keep Reading: Related Posts


Any information provided on this Website is for informational purposes only and is not intended to replace consultation with a professional mechanic. The accuracy and timeliness of the information may change from the time of publication.