
Planning to test your car’s alternator? Yanking a battery cable while the engine runs is a stunt that belongs to the carburetor era. On modern cars, it can spike voltage and roast electronics. A simple meter gives you real answers without collateral damage.
A quick note before we start: many late-model vehicles vary charge voltage on purpose. You may see the number drift in the high-12s one moment and climb into the mid-14s the next. Don’t chase a single reading. Watch how the system behaves as loads and RPM change.
First, A Quick Reminder to Check the Battery
Before you test the alternator, you need to make sure the battery has sufficient cold cranking amps. Think of the battery as an electric fuel tank in that way. When it’s new, it may have 750 CCA.
The CCA on every car battery drops every year a little more until there isn’t enough power in the battery to spin the starter. CCA testers online are cheap and easy to use, so buy one if you want to keep track of your battery’s CCA. And keep the battery connections clean, too.
If you suspect you have a charging system issue, don’t do anything until you determine that the battery or charge light works.
If you switch on the key and don’t see the charge light, believe it or not, that could be the reason why the alternator isn’t charging because the voltage passing through that light to the voltage regulator actually turns the voltage regulator on in many cases. Find out why.
Make sure to leave those battery cables connected while testing. You need a voltmeter to do this.
Test Your Alternator if You Notice These Symptoms
The following are classic signs that you need to test your alternator:
- A glowing battery/charging light
- Headlamps that pulse or dim (or look strangely bright)
- A hot-rubber smell near the belt
- A faint whine or grind from the alternator area (bad stator or rectifier)
- Blower speed that drifts with RPM
- Windows that slow for no obvious reason
Things You Need to Test the Alternator
- Digital multimeter (DMM) with DC and AC voltage ranges
- Clip leads or insulated probe extensions
- Optional clamp ammeter (nice to have, not mandatory)
- Small wire brush for crusty terminals
- Flashlight
A basic DMM covers nearly everything below; fancy shop analyzers just combine these same steps.
Step 1: Battery Baseline (Engine Off)
- Key off, everything quiet for a few minutes.
- Meter on DC volts. Red to +, black to − (or a clean, unpainted chassis ground if the terminals are clean)
- Target: roughly 12.4–12.7 V. A number well under that? Charge and load-test the battery first. A weak battery can make a healthy alternator look lazy. If you’re using a high-current charger, watch the battery voltage after charging on high for 3 minutes. If the battery charge voltage from a high current charger goes over 15.6 volts, the battery is sulfated and needs to be replaced first.
If your battery is buried in the trunk or under a seat, probe at the under-hood jump posts. Automakers provide those for exactly this job and for jump starting.
Step 2: Charging Voltage at Idle (Engine Running)
- Start the engine and let it idle.
- Probe the battery posts again.
- Conventional systems: expect ~13.8–14.4 V at warm idle with accessories off, depending on temperature and battery state.
- Smart/variable-voltage systems: expect movement. You might see mid-12s to low-13s during cruise or light load, then mid-14s (sometimes a brief step into the 15s) during decel, heavy electrical demand, or cold starts. Judge the pattern and the response to loads/RPM.
Red flags:
- Stuck near rest (~12.6 V and dropping as the engine runs): not charging.
- Low and unmoved by RPM or loads: under-charge; think belt slip, weak alternator, or wiring losses.
- High for more than a blip on a non-smart car (>15 V): likely a regulator problem.
Note: If you came here wondering how to test an alternator with a voltmeter, this idle reading is the best move: fast, safe, and revealing.
Step 3: Load Check at ~2,000 RPM (Real-world Stress Test)
- Bring revs up to roughly 1,800–2,000 RPM.
- Switch on the energy hogs: high beams, rear defogger, blower on high.
- A healthy conventional system should settle in the mid-13s to mid-14s after a brief dip and recovery.
- If voltage dives and stays down, look for belt slip, a bad alternator, poor grounds, or excessive drop across the charge cables.
Step 4: Voltage-Drop Tests
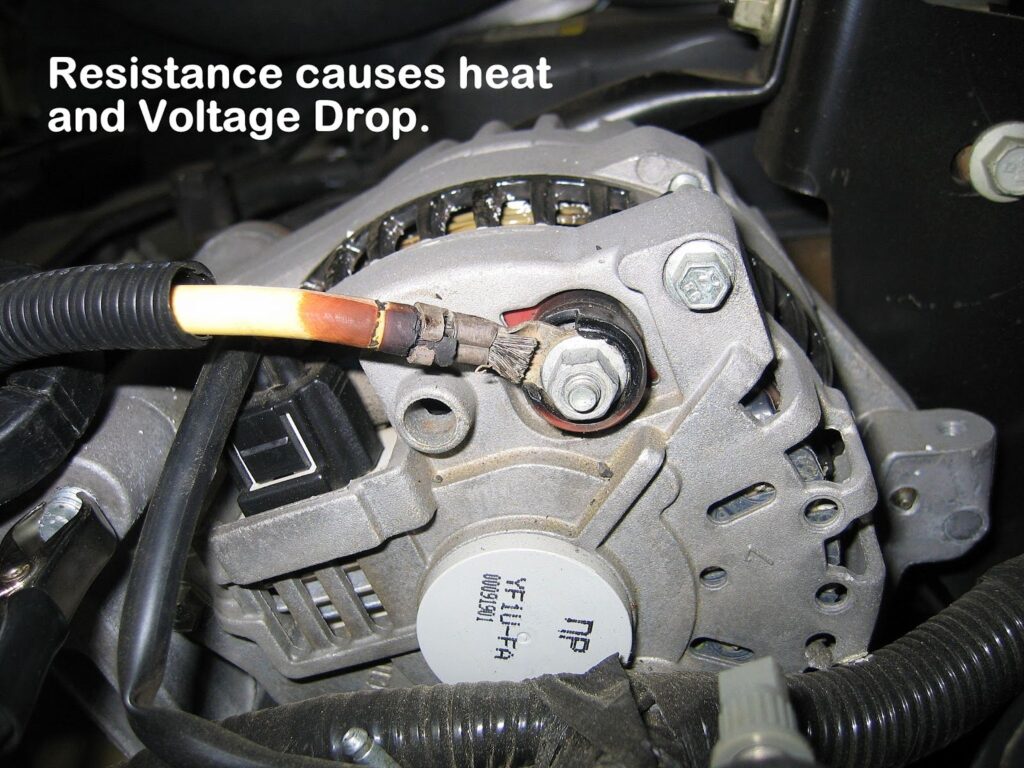
Low voltage at the battery doesn’t automatically point to a bad alternator. The power might be dying due to corrosion or a weak link. A quick voltage-drop test points right at the bad spot.
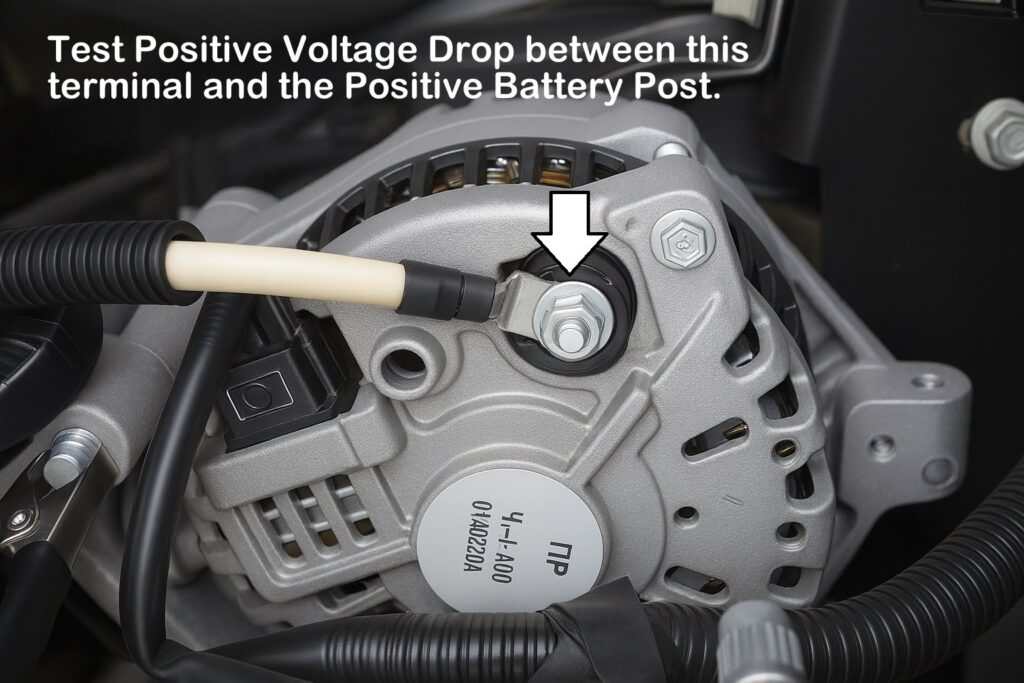
Positive path (always do voltage drop tests under load):
- Meter on DC volts. Red on the alternator B+ stud, black on the battery + post.
- Hold ~2,000 RPM with big loads ON. Read the drop. Target: ≤ ~0.2 V.
Ground path:
- Red on the battery − post, black on clean alternator case (or a stout engine ground).
- Same load. Target: ≤ ~0.2 V.
Numbers bigger than those indicate resistance: loose fasteners, corroded lugs, overheated cable, or a failing fusible link. Clean or repair, then re-test before blaming the alternator.
Quick wiggle check: with the meter connected, gently flex the small field/sense connector and nearby harness. If readings flicker, you’ve likely found an intermittent open masquerading as a dying alternator.
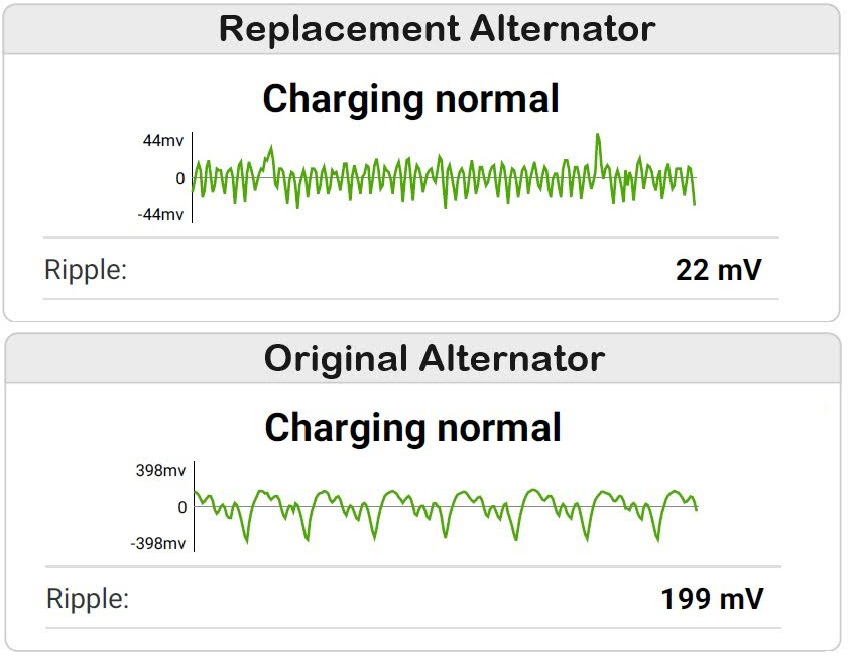
Step 5: AC Ripple / Diode Health
Alternators make AC, diodes convert it to DC. When a diode slips, AC ripple leaks into the system. If this happens, you’ll see lamp shimmer, odd module behavior, or a battery that won’t stay charged, even when DC voltage seems fine.
How to spot it:
- Meter to AC volts.
- Leads on the battery posts.
- Engine around 1,500–2,000 rpm, major loads ON.
On a typical multimeter, you want a small AC number: a few tenths of a volt. A significantly higher reading hints at a failed rectifier or stator, which means it’s time for an alternator replacement. You can remove the unit and confirm on a bench test.
Note: And that’s why folks asking how to test an alternator with a multimeter should add one AC check to the DC steps because it catches diode trouble fast.
Interpreting Your Readings
- Everything lines up (healthy rest voltage, sensible running voltage, tiny drops, low ripple). If a charge light still pops up, scan for codes and look at control-side items on smart systems (battery current sensor, LIN/communication line).
- Low at the battery and a big drop on one side: It’s probably the wiring, not the alternator. Fix the cable/terminal/fusible link and re-test.
- Low at the alternator stud and the battery, or ripple that’s clearly high: This points to an internal alternator fault (brushes, diodes, stator, regulator). Replace it or bench-test to confirm.
- Non-smart car living above ~15 V for more than a moment: Overcharge, typically a regulator issue. Warning: you could end up boiling the battery if you let it ride.
Tip: If your goal is to know how to test if the alternator is bad without getting lost in numbers, combine the loaded voltage check, both drop tests, and the ripple reading. That trio separates a “dead alternator” from wiring issues better than any single number.
Other Issues That Masquerade as Alternator Failure
Wiring and Grounds
Follow the heavy B+ cable for swollen insulation, heat marks, and green lugs. Clean battery posts. Confirm the engine-to-chassis ground strap is tight at both ends. A high drop during Step 4 is a smoking gun.
Fuses and Fusible Links
Many charged circuits pass through a mega-fuse or link. If the alternator B+ stud shows near-zero with the engine running, suspect an open fuse/link or a broken run.
Smart Charging Control
A confused battery current sensor or a lost comm line can command low charge on purpose. That’s why a quick scan is worth your time when the lamp is on but meter readings look fine.
Overrunning Alternator Pulley (OAD/OAP)
A one-way clutch pulley that’s past its prime will chirp, flutter the belt, and drop charge at idle even if the alternator passes electrical tests. If you’re swapping the alternator and the pulley feels gritty or loose, do both together.
Bench Testing: The Tie-breaker
See this short video for using a simple meter with diode check function to measure the health of the rectifier and stator:
If the readings are confusing, get your alternator bench-tested. Major chains will spin it under load to confirm whether output and ripple meet spec.
Note: If you’ve been wondering how to bench test an alternator without owning a load bench, this is the way to go, and it’s often free.
Screenshot-friendly recap (five lines you can live by)
- Battery at rest: ~12.4–12.7 V.
- Idle, no big loads: ~13.8–14.4 V on conventional systems; smart systems move by design (watch the pattern).
- ~2,000 rpm with loads: voltage settles mid-13s to mid-14s; a big sag that stays down needs investigation.
- Voltage drop under load: ≤ ~0.2 V on the positive path and ≤ ~0.2 V on the ground path. Fix wiring if higher.
- AC ripple: small; a big number hints at bad diodes/stator.
Wondering how to test your alternator at home? That list is the entire routine. No shop gear required.
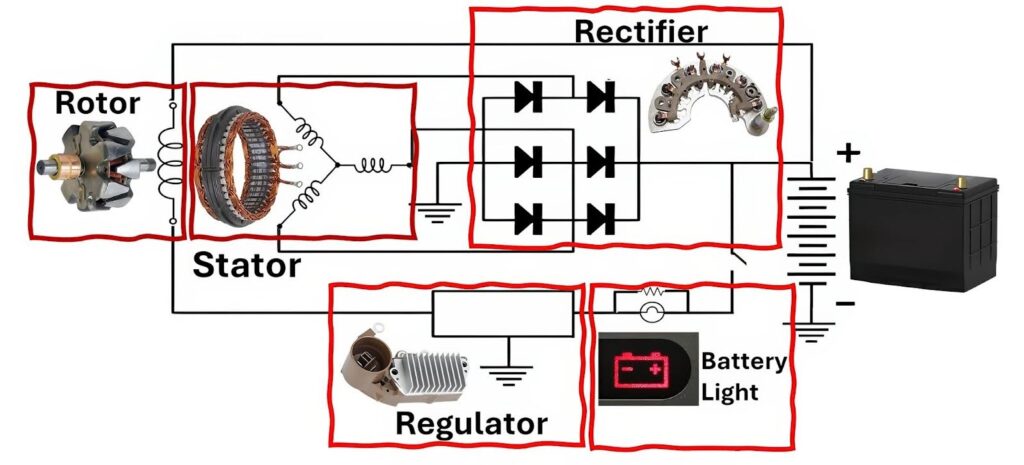
Alternator, Regulator, Battery: Who Does What
In your car, three pieces share the workload. The alternator makes electricity, the regulator (usually inside the alternator or built into the ECM/PCM circuitry) tells it how hard to push, and the battery stores energy and smooths the bumps.
A rested 12-volt battery sits near 12.6 V with the engine off, while a conventional charging system typically lands around 13.8–14.4 V at warm idle with accessories off.
The voltage regulator, wherever it is, measures battery voltage and controls current as a duty-cycle square wave output to the alternator rotor through the brushes.
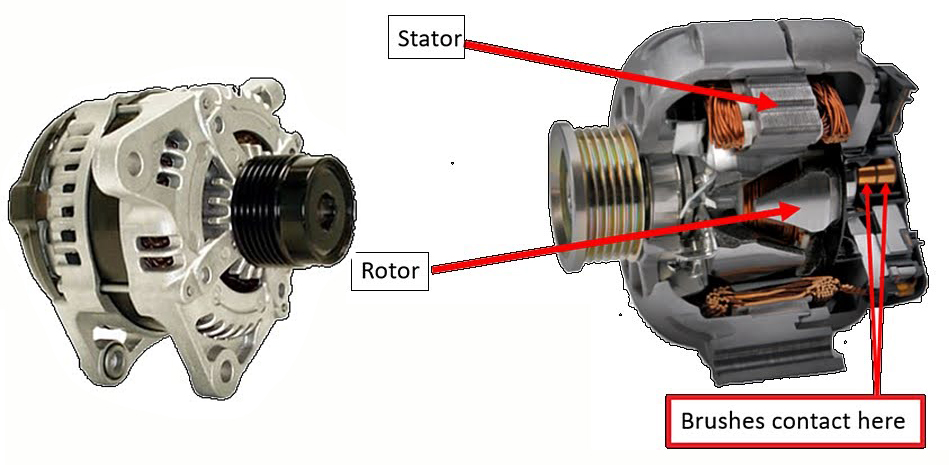
The rotor is thus magnetized in direct proportion to the current flowing into it through the brushes from the voltage regulator circuit. As the rotor’s claw-shaped core ends whirl inside the laminated core of the stationary winding (the stator) with a 0.040 inch or so gap, the rotor’s magnetism creates voltage and current in the 3 stator windings.
The voltage and current are then rectified by the diodes from AC to DC and fed out the big terminal on the alternator to the battery, where it is stored.
That running voltage is what pushes current back into the battery. Readings above 15 V on a non-smart system point to trouble.
Where to Go Next if Replacement Makes Sense
If your readings point to a bad alternator, we can get you the right unit without guesswork. At CarParts.com, we stock new and remanufactured alternators matched by year/make/model, so amperage, connector clocking, and pulley style line up the first time. Warranty and return terms are spelled out on each product page, so you know what you’re buying.
Want a little cushion while you wrench? Our CarParts Plus membership adds real-world perks: free shipping on a large selection of eligible items, longer return windows for online orders, and 24/7 roadside assistance: jump-starts, tow, lockout, fuel delivery. If the alternator quits for good before the box lands on your porch, that last bit can save the day. Check out CarParts.com now.
Keep Reading: Related Posts


Any information provided on this Website is for informational purposes only and is not intended to replace consultation with a professional mechanic. The accuracy and timeliness of the information may change from the time of publication.


