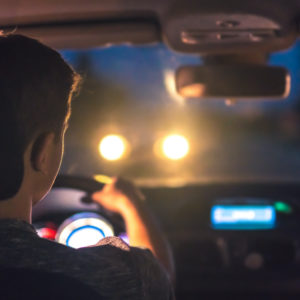
Parade week piles extra challenges on top of normal low-light driving. You get pedestrians stepping off curbs without warning, people crossing mid-block between parked cars, reflective costumes that hide movement until the last second, and temporary barricades that appear where an open lane existed the day before. Add drivers hunting for parking, scanning for friends, and making last-minute lane changes near closures, and you have a genuine recipe for a bad night.
Weather compounds everything. Wet pavement reflects headlight beams like a mirror, creating bright hotspots that wash out detail around crosswalks and painted markings. Light fog or drizzle scatters light back toward your eyes, making glare feel suffocating even when the road looks only mildly wet. Small improvements in seeing distance and glare control matter far more than most drivers expect.
How to Tell When Your Headlights Are Failing or Misaligned
If you feel like you are outrunning your low beams, you’ve probably lost seeing distance from poor aim, aging bulbs, lens haze, or voltage drop.
If oncoming drivers flash you frequently, your low beams may aim too high or scatter light above the cutoff line. If you see a bright patch close to the bumper but the road ahead stays dark, your lights aim too low, and you are shortening your reaction time at exactly the wrong moment.
Look at the front of the vehicle as well. A headlight that looks dimmer or a different color than the other side points to bulb aging, the wrong bulb type, or a weak electrical connection. A light that flickers, cuts out over bumps, or changes brightness with engine speed suggests a connector, ground, relay, or charging issue.
Condensation that lingers inside the housing or keeps coming back means the assembly leaks, which corrodes terminals and dulls reflectors over time.
What Lens Haze Actually Does to Your Beam
Think of a hazed lens like frosted glass over a flashlight. Instead of projecting a focused beam down the road, the lens scatters light in every direction. That cuts your usable seeing distance, increases glare for oncoming drivers, and lowers contrast on the road surface. During parade week, that contrast matters because pedestrians in dark clothing and temporary signs can blend into the background until your headlights finally catch their edges.
Surface haze usually responds well to restoration if you finish with real UV protection. Internal clouding, damaged reflectors, or heavy pitting generally point toward replacement because the optics cannot shape light correctly, even if the outside looks freshly polished.
Restore when the lens has surface clouding or yellowing, the housing stays dry, and the beam pattern still looks controlled. A good headlight restoration kit with a UV sealant can recover meaningful seeing distance. Skip the UV coating, and the haze comes back faster than you expect.
Replace when the lens has deep pitting, cracking, or persistent moisture inside the housing, or when the reflector looks damaged. Broken mounts matter too because you cannot keep aim stable if the assembly shifts every time you hit a bump or a rough curb.
How to Aim Your Headlights in the Driveway
Start on level ground facing a wall. Set tire pressures correctly, unload any unusual cargo that changes your ride height, and bounce each corner gently to settle the suspension. Measure from the ground to the center of each low-beam projector or bulb, then mark that height on the wall with tape. Add marks for the vehicle centerline and each headlamp centerline so you can keep left and right references straight.
Back up to about 25 feet from the wall, keep the steering wheel straight, and turn on your low beams. Adjust vertical aim so the main cutoff lands at or just below the marked headlamp height, with both sides even. Adjust horizontal aim so each beam centers slightly to the right of its corresponding headlamp mark, which helps you see the passenger side without pushing glare into oncoming lanes.
After adjustments, take a slow drive on a dark street and confirm you gained seeing distance without lighting up oncoming mirrors and faces.
Some vehicles use adaptive or auto-leveling systems that need professional calibration after headlamp replacement. Use the driveway check as a quick sanity test, then get professional aiming if the pattern still looks off.
What Safe Bulb Upgrades Actually Look Like
The safest visibility gains come from correct fitment and beam control, not from chasing the highest brightness number on the packaging. Use the exact bulb type your vehicle and headlamp design specifies, and replace bulbs in pairs so output and color stay balanced.
A mismatched bulb type can look bright while actually performing worse because the wrong focal position scatters light upward and outward. This creates glare and reduces useful illumination down the road.
Road legality varies by state and application, so confirm both fitment and legal status before you install anything marketed as an upgrade. If you want a parade week backup plan, keep a spare set in the car along with whatever tool you need to access the bulb.
Electrical Problems That Dim or Flicker Your Headlights
Electrical supply issues can mimic bad bulbs and poor aim, so check the basics before you assume you need new hardware. Corroded battery terminals add resistance and reduce voltage to your lighting circuits. Loose or rusty ground points can create intermittent faults that show up as flicker, one-sided dimming, or lights that cut out over bumps. Heat-damaged connectors at the headlamp cause dimming and flicker and tend to get worse quickly because resistance generates more heat, which creates more resistance.
Charging health matters most in stop-and-go parade traffic. If the alternator underperforms at idle, you may see brightness change when you run the blower, rear defrost, or other accessories. A quick check is to start the engine, turn on low beams, and watch for brightness changes as you raise RPM slightly or switch on major accessories. If brightness swings noticeably, get the charging system tested before you count on a long night drive.
Parts to Inspect for Safer Night Driving
A quick walk-around before parade week can reveal problems that drain your visibility without announcing themselves. Here are the key parts worth checking.
Headlight Assembly
Headlight assemblies and housings do more than hold a bulb in place. They keep the optics aligned so the beam stays focused with a stable cutoff that lights the lane without blasting glare at oncoming traffic. Check for recurring condensation, loose mounting points, and beam patterns that look uneven from side to side. Cracked mounts or a leaking seal are good reasons to replace the assembly outright since you need a stable aim through stop-and-go traffic and curbside parking.
Headlight Bulb
Headlight bulbs control the light source, but the housing controls where that light lands. Bulbs lose output gradually as they age, and your eyes adapt to the change, so you may not notice how much seeing distance you have lost until you hit an unlit road. Replace bulbs in pairs when you notice dim output or uneven color, and use the exact type specified for your vehicle and housing design.
Headlight Lens
Lens condition deserves a close look if your beams look fuzzy or feel like they do not reach far enough. Surface oxidation responds well to a proper restoration kit with UV sealant included.
Deep pitting or internal clouding, however, usually calls for replacement since no amount of polishing fixes damage you cannot reach from the outside.
Fuses and Relays
Fuses and relays protect and manage your lighting circuits, and they can fail in ways that look like bulb or wiring problems. A relay that starts breaking down under heat can cause headlights to flicker or cut out during a long night of idling in parade traffic.
Match the original amperage and relay type exactly when you replace them, and treat melted plastic around any fuse box slot as a sign to stop driving at night until you find the root cause.
Wiring and Connectors
A slightly loose connector can flicker over bumps, and a corroded terminal runs hot, which increases resistance and dims the bulb further over time. A rusty or loose ground point can produce one-sided dimming or uneven brightness, and wet parade conditions make those symptoms worse.
Look for green corrosion, heat discoloration, and connectors that do not click firmly into place.
Battery and Charging System
The battery and charging system carry the load for everything running at once during a parade night drive, including headlights, cabin blower, defrost, and phone charging, often at low RPM where alternator output drops.
Check battery terminals for corrosion and make sure the clamps sit tight, since even a modest voltage drop can dim your headlights noticeably. If you suspect an alternator issue, get a charging system test before you rely on late-night driving, because a slow fade in electrical output is much harder to catch than a bulb that simply burns out.
The Quick Pre-Parade Checklist for Night Driving
Run through this before you head out on any parade week night. Confirm that the low beams and high beams work on both sides and that the patterns look similar left and right. Confirm that turn signals, hazards, brake lights, and the license plate light all function because drivers and pedestrians depend on those cues in the dark.
Then clean the windshield inside and outside. Interior film causes the worst glare because it scatters oncoming headlights across the entire glass surface. Check your wipers and top off washer fluid since road film builds fast in wet parade traffic. If you wear glasses, clean the lenses too because smudges multiply glare the same way a dirty windshield does.
In rain or fog, use low beams since high beams reflect off moisture and create backscatter that can feel like a wall in front of you. Slow down, increase your following distance, and treat faded lane markings as reduced visibility even if traffic around you moves faster. Keep glass and lenses clean throughout the night because road spray leaves a film that turns every passing headlight into a glare source.
Get Your New Headlights and More at CarParts.com
When you know what your vehicle needs, the last thing you want is to order the wrong part and lose a week waiting for an exchange. CarParts.com has spent decades building a catalog of more than one million products, and their fitment tool lets you shop by year, make, model, and trim so you land on the right part the first time.
They also work directly with manufacturers to cut out the traditional supply chain markup and pass those savings to you. This gives you access to the top aftermarket brands that manufacture automotive lights that deliver excellent beam performance, moisture resistance, and certification compliance for better road visibility.
For headlight assemblies, bulbs, restoration kits, fuses, connectors, or anything else on your pre-parade checklist, CarParts.com is a practical first stop.
Keep Reading: Related Posts


Any information provided on this Website is for informational purposes only and is not intended to replace consultation with a professional mechanic. The accuracy and timeliness of the information may change from the time of publication.