
Dash cam installation is straightforward when you break it into three decisions: where the cameras go, how they get power, and how the wiring is hidden. Mount the front camera high behind the rearview mirror, place the rear camera at the top center of the back glass, and choose plug-in power for a quick setup or hardwiring for the cleanest finish and full parking mode support.
How do you install a dash cam correctly?
Installing a dash cam the right way comes down to three things: dry-fitting the cameras first, confirming your power plan before attaching anything to the glass, and testing the recording before snapping trim panels back into place. That sequence matters more than the brand you choose.
What you need before starting:
- Front dash cam, and a rear camera if you are running a dual-channel system
- Power lead, OBD harness, or hardwire lead
- High-endurance microSD card if your camera does not include one
- Glass cleaner or isopropyl alcohol
- Microfiber towel
- Trim tool
- Cable clips or zip ties
- Fuse taps, multimeter or test light, and a ground point if hardwiring
- Spare adhesive pad
Preparation:
- Prep the camera before mounting anything. Insert the card, update firmware if needed, pair the app, and finish the initial setup while the unit is still easy to handle.
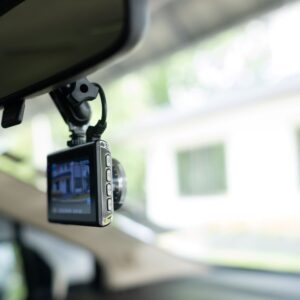
- Dry-fit the front camera. Hold it behind the rearview mirror and confirm the lens has a clear view of the road without looking through frit dots, a rain sensor housing, or a tinted band at the top of the glass.
- Choose the power method before you commit. Plug-in, OBD, and hardwire installs all route differently, so make this decision before peeling the adhesive backing.
- Clean and dry the glass thoroughly. A dirty or cold windshield is the quickest way to end up with a mount that falls off a week later.
- Mount the front camera and set the angle. Aim it slightly downward so the road fills most of the frame and the sky does not blow out the exposure.
- Mount the rear camera only after checking hatch or trunk movement. For a front and rear dash cam setup, the extra work is mostly about clean cable routing and leaving enough slack wherever the rear glass moves.
- Route the cables loosely before securing them. Tuck them into the headliner and trim, but keep enough access to fix a bad connection without redoing the entire run.
- Test both channels before final reassembly. Confirm startup, recording, rear camera detection, app connection, and parking mode if your camera supports it.
Warning: Do not fully reinstall pillar trim until you have confirmed the camera powers up every time and the rear channel stays connected over bumps.
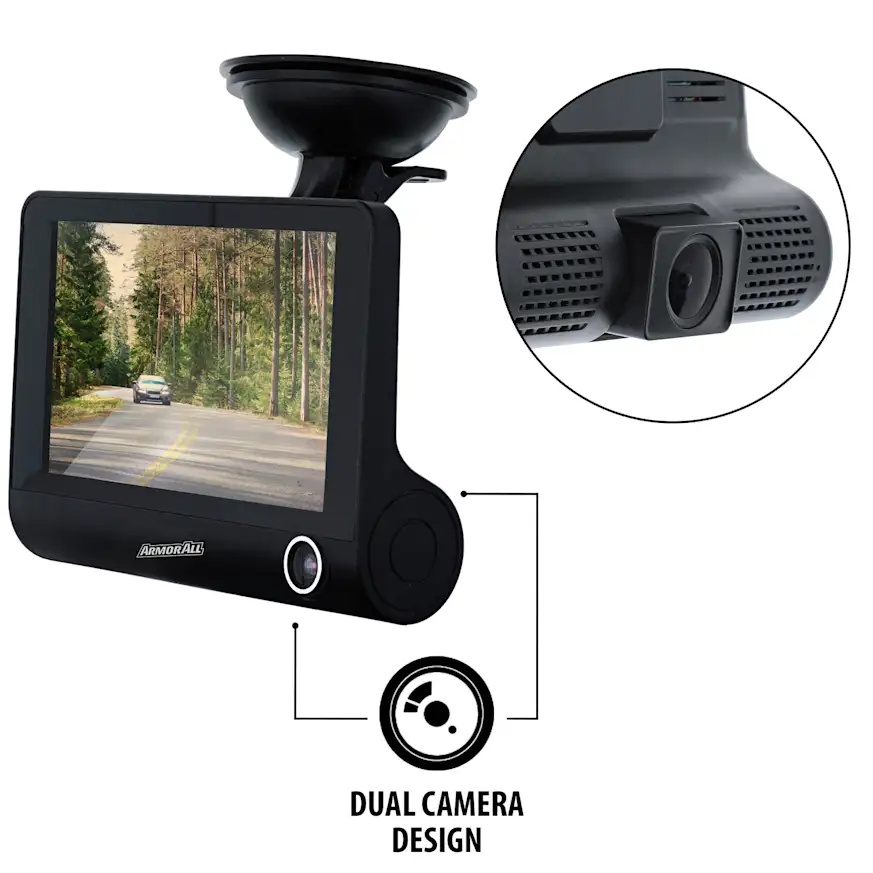
Where should you mount the front and rear cameras?
The best mounting position is high, centered, and out of your sightline. For most vehicles, that means behind the rearview mirror near the top of the windshield.
For the front camera, follow these placement guidelines:
- Mount it high on the windshield, near the center
- Position it behind or just to the passenger side of the rearview mirror
- Make sure the lens is looking through the area swept by the wipers
- Avoid blocking rain sensors, forward cameras, or other driver-assistance hardware
- Keep the mount away from heavily textured frit dots if the adhesive cannot sit flat on them
For the rear camera, the best position is usually the upper center of the inside rear windshield.
- Place it as high and centered as possible
- Keep it clear of the third brake light housing
- Avoid mounting directly on rear defroster grid lines
- Check that the rear wiper sweep and the tint edge do not cut into the camera’s field of view
- On hatchbacks and SUVs, leave a service loop in the cable and route it through the liftgate boot when possible
A quick example shows why the service loop matters. On a midsize SUV, a rear camera mounted neatly at the top center of the liftgate glass may look finished at first, but a cable pulled tight will fail early as the hatch opens and closes over time. Leaving a small slack loop and running the cable through the rubber pass-through prevents what would otherwise become an intermittent rear camera fault.
Which power method makes sense for your install?
Your power method should match the features you actually want to use. A single front camera running off the included 12V plug or a USB power lead is the fastest way to get up and running, but it is not automatically the best option for every vehicle.
| Power method | Best for | What you gain | What changes |
| 12V socket or USB power | Fastest basic install | No fuse work, simple removal, easy to swap cars | Visible wire near socket, parking mode may be limited or unavailable |
| OBD harness | Cleaner install without fuse taps | Often supports parking features and constant power | Occupies OBD port, compatibility varies by camera and vehicle |
| Hardwire kit | Cleanest permanent install | Hidden wiring, 12V outlet stays free, best support for parking mode | Requires fuse box access, testing, and careful routing |
A plug-in install is a good fit for leased vehicles, frequent swaps between cars, or drivers who want to remove the camera regularly. Hardwiring makes more sense when you want a factory-looking result, dependable parking recording, or a cabin free of dangling power cables.
One detail that DIYers often overlook is that some vehicles keep the 12V socket live after the ignition is off, while others cut power immediately. Test your outlet before assuming how the camera will behave when the car is parked.
How do you wire a dash cam without causing electrical or trim problems?
For a clean hardwire install, route the cable where factory wiring already runs, keep it out of airbag deployment zones, and use the right fuse strategy for your camera’s parking features. Most bad installs are not electrical failures. They are cable-routing mistakes that cause problems later.
For a clean hardwire install, you will need:
- A hardwire lead with low-voltage protection
- Fuse taps that match your vehicle’s fuse type
- A multimeter or test light
- A solid chassis ground point
- A trim tool
- Cable clips or small zip ties
A dash cam installation kit can save time, but check the box contents before starting. Some kits include only trim tools and cable clips, with the hardwire lead or fuse taps sold separately.
- Find the fuse box and identify the correct circuits. You need to know which fuse carries constant power and which one is ignition-switched, especially if the camera uses separate battery and ACC leads.
- Choose safe donor circuits. Avoid anything connected to critical safety systems. Use low-draw accessory circuits and verify them with a meter rather than guessing. For more context, read this guide on automotive fuses.
- Connect the leads correctly. For most parking-mode kits, the battery lead goes to constant power, the ACC lead goes to switched power, and the ground goes to a clean bare-metal chassis point.
- Orient the fuse tap correctly. Installing an add-a-fuse backwards can power the camera while leaving the original circuit poorly protected.
- Route the cable along the headliner and down the pillar carefully. Do not tie the dash cam wire across the face of a curtain airbag or wedge it anywhere an airbag needs to expand.
- Keep the lower cable run clear of pedals, steering shafts, hinges, and seat tracks.
- Test the camera with the ignition on, with the ignition off, and in parking mode before closing up any trim.
If you cannot positively identify the fuse type, the correct live circuits, or a reliable ground point, stop and reassess before going further. At that point, paying for a professional installation is less expensive than chasing electrical problems afterward.
What problems show up after installation, and what do they usually mean?
Most installation problems trace back to four things: poor adhesive prep, the wrong fuse, a bad ground, or a pinched cable. A few quick checks usually identify what failed without any parts swapping.
| Symptom | Likely cause | Next step |
| Camera does not power on with ignition | Wrong fuse, blown fuse, bad ground | Test the selected fuse, inspect both fuses in the tap, confirm metal-to-metal ground |
| Camera records while driving but never enters parking mode | Only switched power is connected, or plug-in outlet turns off | Recheck constant and ACC feeds, then verify parking mode settings |
| Rear camera cuts in and out | Cable not fully seated or damaged where hatch flexes | Reseat both ends and inspect the liftgate or trim pinch points |
| Footage is too dark or too reflective | Camera angle too high, dirty glass, dash reflections | Tilt the lens down slightly and clean the glass inside and out |
| Mount falls off in heat | Glass was not clean or dry, or adhesive was placed poorly | Replace the pad and remount on clean, room-temperature glass |
A less obvious issue involves front camera placement near factory driver-assistance hardware. If the camera body sits too close to the vehicle’s forward-facing sensors or mirror housing, you can end up with an obstructed view, unwanted vibration, or a mount that never bonds properly to the glass.
If the problem looks like a damaged or loose electrical connection, it can help to understand how wires and harnesses work before replacing anything. In some cases, damaged routing near trim or a liftgate can affect a wiring harness or connector rather than the camera itself.
Should you do it yourself or pay a pro?
DIY is the right call for basic plug-in installs and many straightforward hardwire jobs. Professional installation makes more sense when trim is tight, airbags are packaged aggressively, the vehicle has complex sensor hardware, or you want a fully hidden result without any trial and error.
At current big-box retail pricing, a front-only professional install runs around $100, while a front-and-rear setup is around $150, with hardwire hardware priced separately. Professional installation becomes an even stronger option on late-model vehicles with limited fuse-box access or a moving rear hatch.
DIY makes sense when:
- You are using 12V plug-in power
- The camera is front-only
- You already own trim tools and a meter
- You are comfortable identifying switched and constant circuits
- You do not need a perfectly hidden wire result on the first try
Pay for installation when:
- You want parking mode with a hardwired dual-channel system
- The vehicle has fragile trim or dense A-pillar airbag packaging
- The rear cable has to cross a hatch, tailgate, or removable rear glass
- You are not fully confident with fuse taps, grounding, or trim removal
- You need the job done once, cleanly, with no debugging afterward
Done right, dash cam installation comes down to avoiding small mistakes that turn into persistent failures. Good placement, the right power method, and careful cable routing are what separate a clean and reliable install from a camera that only works reliably when the weather is mild and the hatch stays shut. For more buying and setup context, check out CarParts.com’s guides on why drivers use dashcams and the best car cameras for daily driving.
Keep Reading: Related Posts


Any information provided on this Website is for informational purposes only and is not intended to replace consultation with a professional mechanic. The accuracy and timeliness of the information may change from the time of publication.


