A rattling grille can point to a cracked or broken bracket. These small tabs hold the grille to the radiator support or bumper cover. Once one gives out, the whole panel can shift or work its way loose over time.
Replacing a bracket is a manageable fix most drivers can handle in the driveway. It’s also a lot cheaper than swapping out the entire grille assembly. Here’s what causes the problem and how to fix it the right way.
What Causes Grille Brackets to Crack or Loosen?
Brackets take a beating from vibration, heat, and constant sun exposure. Plastic brackets get brittle over time and eventually snap under normal driving stress. Metal brackets corrode, especially on trucks that see winter road salt.
Common Culprits
A hard car wash brush or a minor parking lot bump can snap a tab instantly. Aggressive DIY grille removal is another common cause of cracked brackets. Once one bracket fails, the rest pick up the extra load and wear out faster.
A rattle up front can also point to a loose radiator support, another common source of front-end vibration. That chain reaction is why a single loose bracket often turns into three within a season. Catching the problem early keeps the repair small and affordable.
Other Causes of a Rattling Grille to Check First
Before ordering new tabs or brackets, it’s worth checking a few quicker, cheaper causes:
[IMAGE FROM REVIEWER HERE | FILENAME: grille-rattle-causes-mounting-hardware.jpg]
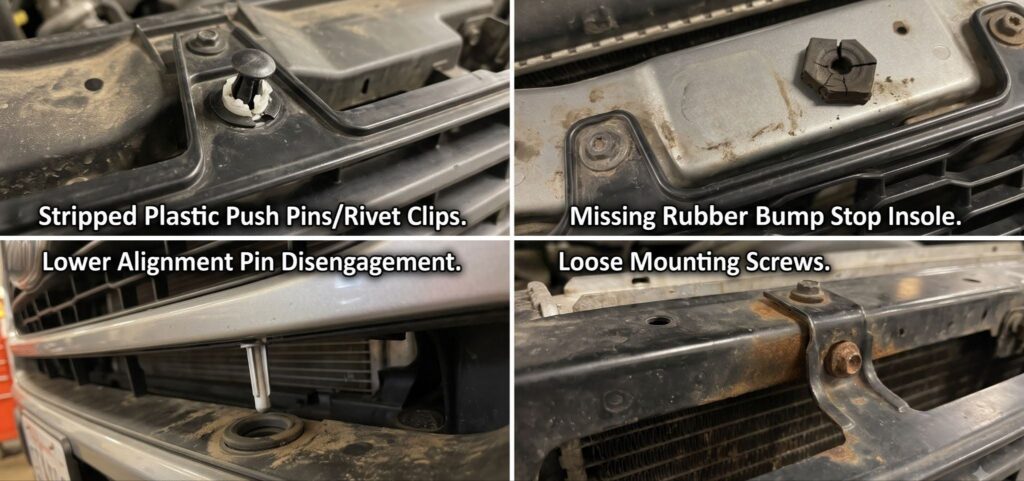
[AI CAPTION] Four examples of grille mounting problems: damaged plastic push pins or rivet clips, a missing rubber isolator, disengaged lower alignment pins, and loose mounting screws. | Image Source: Richard McCuistian [/AI CAPTION]
- Missing or Stripped Plastic Push Pins/Rivet Clips: Over time, engine vibration and road debris can shear the heads off the plastic retainers along the top radiator core support. The bracket may remain perfectly fine, but without the expansion pin holding it flush, the grille can move loosely.
- Hardened or Missing Rubber Isolators: Some grilles rely on rubber isolators or foam pads between the grille frame and the radiator support to maintain tension and absorb shock. As the rubber dry-rots and falls away, loose clearance develops, creating a chatter even if all brackets and clips are intact.
- Lower Alignment Pin Disengagement: Some modern bumper/grille assemblies use clips at the top and slide-in alignment pins at the bottom. A minor curb nudge or bump can pop the bottom pins out of their rubber grommets without breaking the bracket, leaving the lower half free to rattle against the bumper cover.
- Loose Mounting Screws: On older trucks and body-on-frame SUVs, direct machine screws or sheet metal screws thread into J-nuts. If a J-nut rusts out or comes loose, the bracket loses clamp load.
Checking for missing push pins or dry-rotted rubber isolators first can often save you from replacing a bracket that isn’t actually broken.
How to Replace Grille Brackets in a Few Steps
Access varies quite a bit by vehicle, so check the mounting style before diving in. On many cars, the bracket sits behind the grille and is reachable from the engine bay. On vehicles with a grille built into the bumper cover, partial bumper removal is usually necessary first.
Grab a trim panel tool, a small ratchet, and the correct replacement bracket before starting. If the grille houses sensors, cameras, or lighting, locate the wiring harness before pulling anything loose.
Turn the ignition off before disconnecting wiring and follow the vehicle’s service procedure. If grille or bumper removal affects a driver-assistance radar sensor, camera, or its mounting, have a qualified technician handle any required alignment or calibration before driving.
- Open the hood, or remove the upper bumper fasteners if the grille is bumper-mounted.
- Disconnect any wiring harness connected to sensors or lights near the bracket.
- Remove the clips or screws holding the grille in place.
- Detach the damaged bracket from the radiator support or frame.
- Compare the old bracket to the new one for size and hole spacing.
- Install the new bracket and snug the fasteners without overtightening.
- Reattach the grille, reconnect any wiring, and press each corner to check the fit.
- Start the engine and listen for rattles before hitting the road.
Snapping a photo of the original setup before removal makes reassembly easier. It’s a small step that prevents guesswork later in the process.
Picking the Right Bracket for Your Vehicle
Grille brackets aren’t universal across trim levels, even within the same model year. A bracket built for a base trim grille might not match a sport package bumper.
It helps to know the bumper cover vs bumper difference when identifying where a bracket actually mounts. The two parts look similar but serve different structural roles.

What to Check Before You Buy
- Exact year, make, model, and trim level
- Whether the grille is one piece or split into upper and lower sections
- Bracket material, since metal, plastic, and metal-reinforced plastic brackets each mount differently
- The old part number, if it’s still legible on the original bracket
- Clip style, since single-tab and dual-tab clips aren’t interchangeable
Matching these details up front saves a return trip and a second order. A little research here goes a long way toward a clean install.
Why Aftermarket Brackets Are a Smart Buy
Aftermarket grille brackets offer real value without sacrificing fit or durability. Many aftermarket options match or beat OEM quality at a fraction of the price. They’re a solid choice for anyone who wants a reliable repair without dealer markup.
Buying Online for the Best Deal
Shopping online typically beats a dealership parts counter on price and selection. Prices for common brackets often start around six dollars, making this an easy fix to budget for. Comparing a few listings before checkout helps confirm the best combination of fit and value.
Seasonal sales on body hardware pop up often, so timing a purchase can stretch the savings further. Bundled listings that pair a bracket with unrelated trim pieces are worth a second look too, since sometimes the single part is the better deal.
Mistakes to Avoid During Installation
Overtightening plastic brackets is the most common mistake during a DIY job. Plastic threads strip easily, and a stripped mount means ordering another bracket right away.
Forcing the grille into place before the bracket is fully seated causes gaps and stress cracks. Testing the bracket alone first, then attaching the grille afterward, prevents this issue entirely. Skipping that dry fit is the fastest way to crack a brand new part.
Reusing old, brittle push clips with a new bracket sets the repair up to fail again soon. Swapping clips at the same time costs very little compared to redoing the whole job later. Using the correct clip style also matters, since a mismatched clip rarely seats the way it should.
A similar clip-based approach comes up when attaching a mesh grille to a bumper, since a snug, even fit matters just as much there.
A cracked or loose grille bracket is a small problem that only grows if it’s ignored. Catching it early and replacing the part keeps the rest of the mounting system healthy. Browsing CarParts.com for a bracket that matches your exact vehicle is a quick way to get the job done right.
Keep Reading: Related Posts






Any information provided on this Website is for informational purposes only and is not intended to replace consultation with a professional mechanic. The accuracy and timeliness of the information may change from the time of publication.