Most parking assist problems start with a false alarm, not a dead sensor. Before spending money on parts, a vehicle-appropriate reset or diagnostic code-clear procedure can clear some temporary software faults and help determine whether the system needs more than a simple restart.
Here’s how to reset a parking assist sensors the right way, from the quickest fix to the steps that actually last.
Why Is Your Parking Assist Sensor Triggering False Alarms?
A reverse parking sensor that beeps constantly, or one that goes silent mid-session, can have several causes before the sensor itself fails. Dirt, mud, or ice on the sensor face is the most common culprit. Excessive paint or overspray on the sensor face can also interfere with the ultrasonic signal. Paint-thickness limits are vehicle-specific, so don’t rely on a universal 6-mil threshold. A loose or corroded sensor connector hiding behind the bumper can also cause problems. A stored diagnostic trouble code doesn’t cause the fault by itself. It records a condition the module has detected, so read and record the code before clearing it.
Tip: Press a fingertip gently against each sensor while a helper activates the parking sensor system as specified for the vehicle. A working ultrasonic sensor may produce a faint click or vibration. No vibration can indicate that the sensor isn’t firing, but it isn’t conclusive by itself because some systems can disable multiple sensors when a fault is detected.
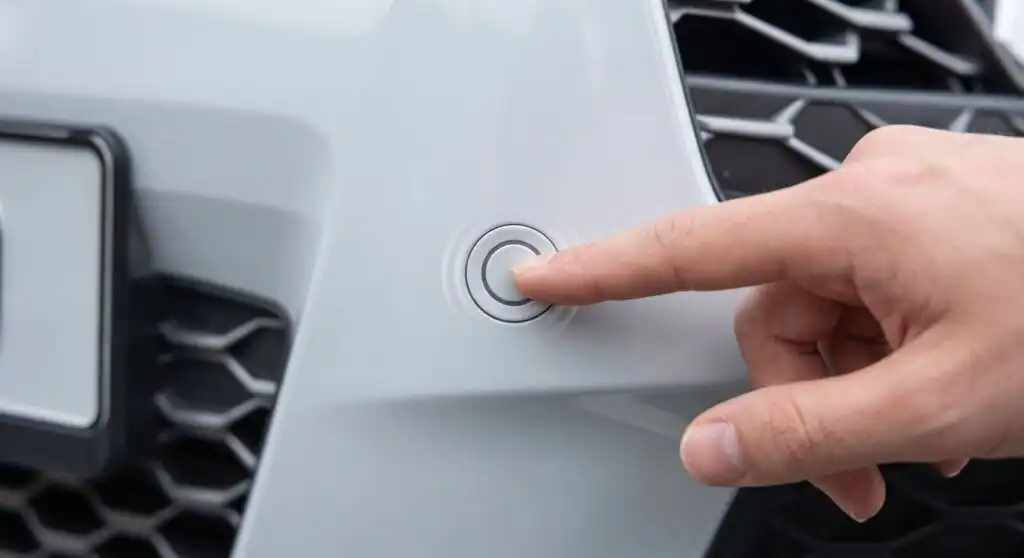
Start here before touching any reset procedure. A sensor buried under a mud film will trigger the same errors after a reset that it triggered before. If the park assist system is throwing a warning message on the dash rather than a beep, that’s a separate diagnostic path worth understanding before resetting anything.
How to Reset a Parking Assist Sensor: Three Methods
Reset procedures vary by manufacturer and model. Start with the least invasive checks, then move to scan-tool diagnostics, and follow the owner’s manual or service information for your exact vehicle when a specific reset or relearn procedure is required.
Method 1: Power Cycle via Dashboard Switch
Turning the parking assist system off and back on can be a useful first check, but there is no universal 10-second dashboard-button reset that applies to most vehicles. A general functional check is:
- Park on a flat surface with no obstacles within 10 feet.
- Start the engine and let it idle.
- Locate the park assist on/off button (usually near the shifter or infotainment panel).
- Press and hold the button for 10 seconds to force a system shutdown.
- Wait 5 seconds, then press again to turn the system back on.
- Shift into reverse to test.
If the warning remains, use the manufacturer-specified diagnostic or reset procedure rather than repeatedly holding or cycling the button.
Note: Some Ram dealer guidance describes cycling the rear ParkSense button off and on 10 times, leaving the system on after the 10th cycle. This should not be treated as a universal ParkSense reset. Verify the procedure for the exact model and year before using it.
Method 2: Battery Disconnect Reset
A battery disconnect is not a universal parking-assist reset. On some vehicles, disconnecting power can reboot modules, while on others it can temporarily disable parking features until required relearn conditions are completed. If service information for your vehicle specifically calls for a battery disconnect, turn the engine off, disconnect the negative battery terminal, wait the specified amount of time, reconnect it, and complete any required relearn procedure.
Warning: A battery disconnect clears adaptive memory in some vehicles and can reset the clock, radio presets, and other learned settings. Note any settings before disconnecting. If the battery is old or weak, have it tested rather than replacing it based on age alone.
Method 3: OBD2 Scanner Reset
A basic generic OBD-II reader is primarily designed for standardized emissions-related powertrain diagnostics and may not access the body or chassis module that stores parking-assist codes. To reach parking distance control (PDC) codes, use a bidirectional scanner or a vehicle-specific tool with coverage for the parking-assist module. FORScan is one diagnostic option for supported Ford, Lincoln, Mercury, and Mazda vehicles, but vehicle and module coverage varies. Communication U-codes can also be stored in modules that a basic generic reader cannot access.
Plug the scanner into the OBD2 port under the driver-side dash. Navigate to chassis or body control module diagnostics rather than just engine codes. Read and record any active DTCs before clearing them, then drive briefly and recheck to confirm the codes don’t return.
Skip this: Don’t clear codes and call it fixed. If the same DTC returns within a short drive cycle, the underlying fault is still active.
What Should You Check Before Replacing a Sensor?
A lot of money gets wasted replacing sensors that aren’t actually broken. Clean every sensor face with a microfiber cloth and mild soap first. Then inspect each one for cracks, chips, or a dented face, and check the connector behind the bumper for green corrosion or pushed-back pins.
- Clean every sensor face with a microfiber cloth and mild car wash soap
- Inspect each sensor for cracks, chips, or a dented face
- Check the connector behind the bumper for green corrosion or pushed-back pins
- Confirm the sensor sits flush in its bezel retainer, not cocked at an angle
- Verify no trailer hitch or tow ball is blocking the rear sensor field

Either one of those can cause a system-wide fault without any actual sensor damage.
Also, verify fitment by OEM part number, not just year/make/model. Trim level matters. A standard bumper and a trailer-prep bumper on the same truck can use different sensor part numbers, and swapping them without checking quietly breaks the system.
When Does a Reset Not Fix the Problem?
A reset clears software faults. It doesn’t repair hardware. If the same DTC returns immediately after clearing, that’s a sign the underlying fault is still there. If the sensors share the same part number and the vehicle’s service information allows position swapping, moving the suspect sensor to a known-good position can help isolate the fault. If the fault follows the sensor to its new location, that strongly points to the sensor itself. Don’t swap position-specific sensors or sensors that require calibration without checking the service information first.
Physical signs tell the same story. A cracked ceramic element, water inside the housing, or a dented face all point to a sensor that’s past resetting. Corrosion at the connector that new pins don’t fix means the wiring harness needs attention.
Note: Some vehicles with guided parking or backup camera overlays require a calibration step after sensor replacement or bumper work. Check the service manual before assuming a new sensor is plug-and-play. If a service park assist message stays on after a fresh install, required calibration or initialization is one possibility, along with incorrect fitment, wiring problems, or another remaining fault.
Where to Find a Replacement Parking Assist Sensor
When backup parking sensor replacement is the next step, buying online saves time and money. Confirm the OEM part number or cross-reference number from the current sensor, check the finish (painted, primed, or black plastic), and verify the connector type and prong count. Front, rear, or both positions are all worth noting before ordering.
Many aftermarket replacement sensors are budget-friendly options designed to match OE fit and function. CarParts.com carries a wide selection with fitment filtering by year, make, and model, including individual sensors and multi-pack kits.
Browse the full lineup of replacement parking assist sensors at CarParts.com to find the right fit for your vehicle.
Keep Reading: Related Posts




Any information provided on this Website is for informational purposes only and is not intended to replace consultation with a professional mechanic. The accuracy and timeliness of the information may change from the time of publication.