You might already know that you need a grille reinforcement. The harder part is picking the version that actually matches your vehicle, your damaged area, and the finish that shows through the front end once everything is bolted back together.
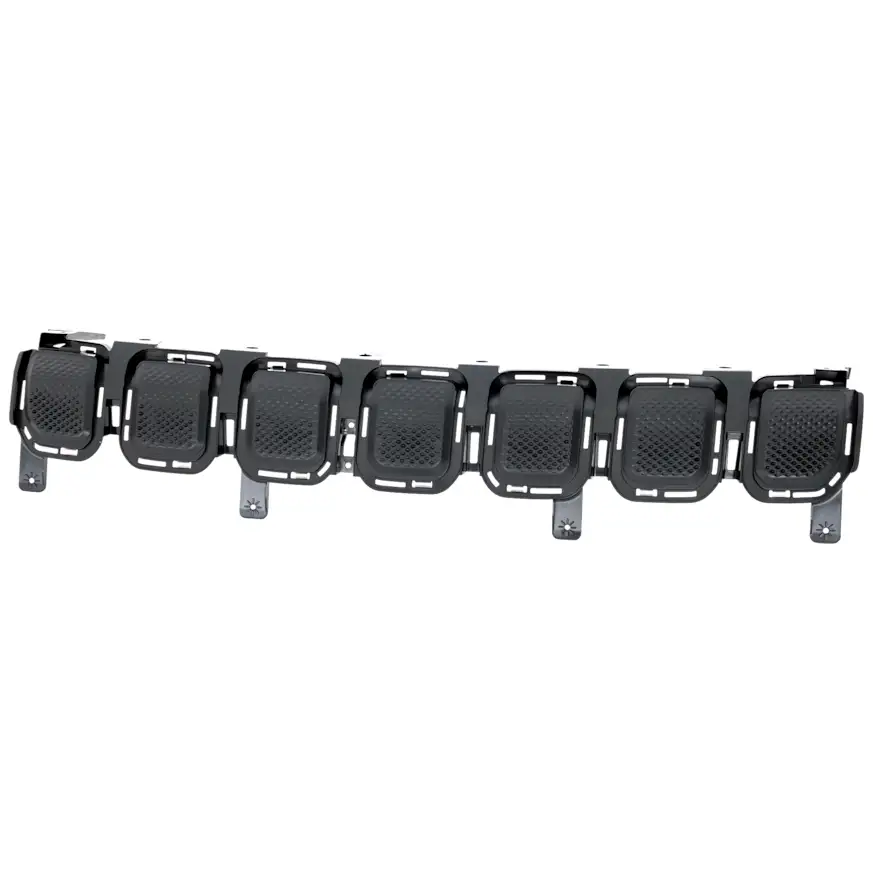
This is a category where the listings look almost identical in thumbnail form. A long, curved bracket photographed against a white background doesn’t tell you whether it’s the upper piece or the lower piece, whether the surface is textured black or textured dark gray, or whether it’s excluded from your vehicle’s particular submodel. Two listings can carry nearly the same part number and differ only by a certification suffix.
That’s why a grille reinforcement order goes wrong more often than shoppers expect. The part itself isn’t complicated. It’s just easy to order the wrong one when the differences live in the listing title rather than the picture.
Use this as a preorder check: confirm the position, finish, submodel, and what’s actually in the box before the part reaches your cart.
How Do You Choose the Right Grille Reinforcement?
Start by confirming your vehicle’s year, make, model, and submodel, since front-end trim packages often break fitment even inside a single model year. Then pin down the position, because upper, center, and lower grille reinforcements are separate parts with separate listings. Next, match the finish in the listing notes, such as textured black or textured dark gray, if the piece is visible through the grille opening. Check whether the listing carries a certification designation or a submodel exclusion in the title, since these details separate otherwise identical products. Finally, confirm the quantity, since these are typically sold individually even when a collision damaged more than one panel.
Start With the Vehicle, Not the Product Image
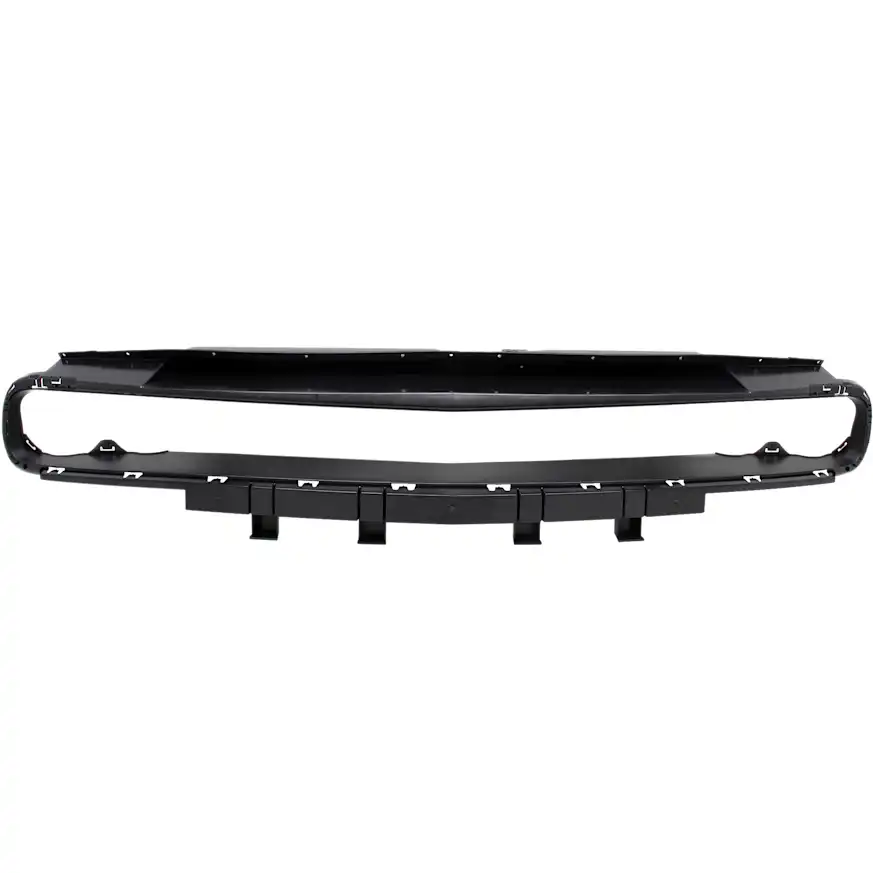
Start with the vehicle, not the thumbnail. Grille reinforcements are shaped to a specific front fascia, which change with trim level, appearance package, and mid-generation refreshes far more often than mechanical parts do.
Use the vehicle selector before you browse, then confirm these details against the listing:
- Year: front-end styling can change mid-generation without a new model name
- Make and model: closely related models often share a platform but not a grille opening
- Submodel and trim: performance and appearance trims frequently use a different reinforcement, and some listings state the exclusion directly in the title, such as “Except SRT Hellcat Model”
- Body style: coupe, sedan, and utility versions of the same nameplate can differ up front
- Front-end features: parking sensors, adaptive cruise radar, tow hook provisions, and license plate mounting can all change the panel’s cutouts
- Production date: late-year changeovers matter for vehicles that got a facelift partway through
A listing that says “Direct Fit” is telling you it’s designed to mount without modification on the applications it covers. It isn’t telling you it covers your ride’s trim. That part is on you to confirm.
Identify the Version Your Repair Actually Needs
Two grille reinforcements can share the same name and still solve different ordering problems. These are the splits that matter most in this category.
- Upper versus lower position: many vehicles use more than one reinforcement across the front end. Listings are usually titled to reflect it, with a “Lower Grille Reinforcement” sold separately from the main grille reinforcement. If the damage is in the lower bumper opening, the upper piece won’t help you, and vice versa.
- Finish and color: when the reinforcement is visible through the grille bars, the listing notes will specify the surface, such as textured black or textured dark gray. These read as similar on a screen and look obviously different on the car. Match the note to what you can see on the vehicle, not to what looks close in the photo.
- Submodel-specific versions: some listings are written as fitting everything in a range except one performance or appearance model. Read the exclusion language before assuming your vehicle is covered.
- Standard versus certified listings: you’ll see pairs of listings for what appears to be the same panel, where one carries a CAPA Certified designation and the other doesn’t. CAPA is a third-party certification program for aftermarket collision parts. Some shoppers want this designation for documentation or insurance reasons, while others don’t need it. It’s a listing attribute to decide on, not a shortcut past the fitment checks above.
- Structural versus visible trim panels: on some vehicles the reinforcement is hidden behind the grille and does nothing but hold the assembly in place. On others it forms part of what you actually see. The first case makes finish irrelevant. The second makes matching the finish important.
Compare the Details That Decide the Fit
Use the product image as a starting point, not as the whole match. If you still have the damaged panel, or you can get a look at the front end with the grille removed, compare these points against the listing photos and specifications:
- Overall width and the curvature of the panel across the opening
- Number and placement of mounting tabs
- Push-pin and clip hole pattern, including spacing along the top and bottom edges
- Cutouts or bosses for parking sensors, radar, or a camera, if your vehicle has them
- Emblem mounting provisions, if the badge sits on the reinforcement rather than the grille
- Tow hook or license plate bracket openings
- Surface texture and color where the panel is visible
- Whether the edge profile matches the upper or lower opening on your vehicle
If the old panel is broken into pieces, photograph it before you order. A single clear shot of the mounting tab pattern resolves most upper-versus-lower questions faster than reading listing titles.

Check What Comes in the Box
A listing can be correct for your vehicle and still be incomplete for your repair. Grille reinforcements in this category are typically listed as sold individually, which means you’re buying one panel and nothing else.
Plan on the following unless a listing specifically says otherwise:
- Grille: not included, and it’s a separate part from the reinforcement
- Emblem or badge: not included
- Clips, push pins, and retainers: often not included, and the originals frequently break during removal
- Fasteners and nuts: not included
- Upper and lower panels: separate listings, so a front-end hit that damaged both means two orders
- Bumper cover, radiator support, or grille surround molding: separate parts entirely
The quantity-sold field on the listing is worth reading closely. If your vehicle uses matching left and right reinforcement pieces, one listing may cover only one of them.
Compare Brands After You Confirm Fitment
Brand matters, but it shouldn’t be the first filter. In this category you might find that a single brand, such as Replacement, covers most of the available applications, which means the real decision isn’t which brand to pick. It’s which configuration of the part is correct for your vehicle.
Instead of asking which brand makes the best grille reinforcement, ask whether the listing in front of you matches your the part’s position, its finish, your vehicle’s submodel, and your certification preference. A familiar brand name on the wrong panel is still the wrong panel.
Where brand-level information does help is in the listing specifications. Warranty terms, product fit designations, and quantity sold are stated per listing, and reading them is more useful than comparing names. For example, listings in this category commonly show a one-year unlimited-mileage warranty from Replacement, along with a direct-fit designation. These are details to verify on the specific listing rather than assumptions to carry across the whole category.
Choose the Right Ownership Lane
The right grille reinforcement isn’t always the most expensive one. It’s the one that matches how the panel will be seen and how long you need the repair to hold.
Lowest-Cost Structural Replacement
This lane fits shoppers whose reinforcement sits entirely behind the grille and never shows. Here the panel is doing a mounting job, not an appearance job, so finish notes matter less and the deciding factors are position and mounting pattern. Don’t overpay for a finish-matched version you’ll never see. Don’t underbuy by grabbing a panel from the wrong position because the price looks better.
Appearance-Matched Daily Driver Replacement
This lane fits anyone whose reinforcement isvisible through the grille opening. Match the finish note exactly, whether it’s textured black or textured dark gray, and confirm the submodel coverage before ordering. Paying a little more for the correctly finished panel is cheaper than ordering twice.
Certified or Documentation-Driven Replacement
This lane fits shoppers handling an insurance claim, a lease return, or a repair where the paperwork matters as much as the part. If that’s your situation, filter toward listings carrying the CAPA-certified designation and confirm the fitment details exactly as you would for any other listing. If documentation isn’t a factor for you, the noncertified listing for the same application is a reasonable choice.
Make the Final Add-to-Cart Check
Before you add the grille reinforcement to cart, make sure the listing matches the vehicle, panel position, visible finish, and the details you can verify from the original part.
- Year, make, model, and submodel confirmed through the vehicle selector
- Position confirmed as upper, center, or lower
- Submodel exclusions in the listing title read and cleared
- Finish note matched to the vehicle, if the panel is visible
- Sensor, radar, tow hook, and emblem provisions accounted for
- Mounting tab and clip hole pattern compared against the old panel where possible
- Quantity confirmed, since these are typically sold individually
- Certification designation chosen deliberately, if it matters for your repair
- Clips, retainers, and fasteners sourced separately if the listing doesn’t include them
- Product specifications and notes read in full before checkout
Start Your Search the Right Way
Set the vehicle first using the selector, then filter down to the grille reinforcement category rather than searching by a general term like grille, which pulls in assemblies, moldings, and surrounds you don’t need.
From there, narrow by position, then by finish, then by submodel coverage. Compare the listing photo against the old panel’s mounting pattern. Decide on the certification designation only after everything above is settled. Add clips or retainers separately if your listing doesn’t include them.
The best grille reinforcement order isn’t the one that looks close enough in a thumbnail. It’s the one that matches the position, the finish, the submodel, and the front-end features of your specific vehicle.
Keep Reading: Related Posts



Any information provided on this Website is for informational purposes only and is not intended to replace consultation with a professional mechanic. The accuracy and timeliness of the information may change from the time of publication.