Cruise control switch failure is one of the more common reasons a driver suddenly loses speed-holding capability on the highway. The switch itself is inexpensive, and replacing it is well within the reach of most DIYers. The tricky part is confirming the switch is actually the problem before spending time and money on the repair.
How to Tell If the Cruise Control Switch Actually Needs Replacing
Before pulling apart the steering wheel, rule out the other usual culprits. Replacing the switch without diagnosing first is the most common buyer regret in this repair.
Check these first:
Fuse
Pull up the fuse diagram for your vehicle and check the cruise control circuit fuse first. A dead fuse takes two minutes to swap and costs nothing. If the replacement fuse burns out again, something downstream is drawing too much current.
Brake light switch
Certain vehicles route cruise cancellation through a dedicated circuit inside the brake light switch. When that circuit fails, the PCM reads the brakes as permanently applied and keeps cruise locked out — a pattern indistinguishable from a dead cruise switch until you test the switch directly.
Clock spring
Abroken clock spring severs the electrical path between the steering wheel and the rest of the vehicle. The signature is losing the horn, the airbag readiness light, and the cruise buttons all at once. Swapping the cruise switch does nothing in this scenario.
OBD-II scan
Run a scan before ordering parts. Codes that reference the cruise switch circuit or servo voltage give you a specific starting point rather than a guess. Learn more about common cruise control fault codes.
If only the cruise buttons are unresponsive and the horn and airbag light are fine, the switch is the likely suspect.
Tools and Parts Needed for Cruise Control Switch Replacement
Tools:
• Flathead screwdriver or plastic trim pry tool
• Phillips head screwdriver
• 10mm or 12mm socket and ratchet (for battery disconnection)
• Electrical contact cleaner (optional but useful)
• OBD2 scanner (for pre- and post-repair verification)
Parts:
• Replacement cruise control switch matched to your year, make, model, and engine
Note: Some vehicles mount the cruise control function within the turn signal stalk or a combination switch on the steering column. Others mount it as a discrete button cluster on the steering wheel. The location determines the removal procedure. Check the owner’s manual or a vehicle-specific forum before ordering.
How to Check Fitment Before Buying a Replacement Cruise Control Switch
Fitment matters more here than with many other parts. Cruise control switches vary not just by make and model but by trim level and option package. A vehicle equipped with adaptive cruise control uses a different switch assembly than one with standard cruise.
Before ordering:
• Confirm the year, make, model, submodel, and engine displacement
• Check whether the vehicle has a column-mounted stalk or a steering-wheel-mounted pad
• Verify whether the switch is sold as a standalone button or as part of a larger combination switch assembly
• Cross-reference the OEM part number if possible, either from the old switch or from the vehicle service manual
Buying online from a retailer that uses a vehicle-specific fitment filter helps eliminate guesswork. CarParts.com carries a range of cruise control switches organized by vehicle fitment, including OE-grade options for a wide range of makes. Always use the site’s year/make/model selector to confirm compatibility before checkout.
Step-by-Step: How to Replace a Steering-Wheel-Mounted Cruise Control Switch
This procedure applies to most modern vehicles with cruise buttons on the steering wheel spokes.
1. Pull the negative cable off the battery post and tuck it away from the terminal. Give the system a full 10 minutes before touching anything near the steering wheel. The airbag capacitor holds a charge after power is cut, and an accidental deployment can cause serious injury.
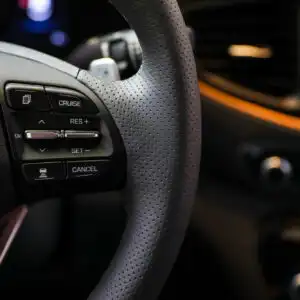
2. Locate the cruise control switch. On most vehicles, it sits on the left or right spoke of the steering wheel as a small button pad.
3. Slide a plastic pry tool into the gap around the switch housing perimeter. Work your way around the edge with gradual, even pressure until each clip releases. Forcing it risks cracking the housing or snapping a retaining tab.
4. Once the switch pad is loose, pull it carefully away from the steering wheel. The wiring harness connector will still be attached.
5. Press the locking tab on the connector and pull the harness free. Before setting the old switch aside, look at the connector pins for signs of corrosion, bending, or packed debris. A quick shot of electrical contact cleaner clears most buildup and gives the new switch a clean seat.
6. Plug the wiring harness into the new switch. A positive click means the locking tab has seated. Give the connector a gentle tug to verify it will not pull free during normal steering movement.
7. Set the new switch into the steering wheel pocket and press evenly across the face until all clips snap home. Run a finger around the edge to confirm it sits level with no raised corners or visible gaps.
8. Reattach the negative battery cable and tighten the clamp snugly.
9. Rotate the key to the accessory or run position without cranking the engine. Watch the airbag indicator on the dash: it should illuminate for a few seconds during self-test and then go dark. A light that stays on means the SRS system has flagged a fault and the vehicle should not be driven until it is cleared.
10. Start the vehicle, reach highway speed in a safe area, and test each cruise control function: on, set, resume, coast, and cancel. Seetypes of steering wheel controls if you need a refresher on how each button works.
Step-by-Step: How to Replace a Steering Column Stalk Cruise Control Switch
Some vehicles, particularly older models and certain European makes, route cruise control through a stalk mounted on the steering column rather than buttons on the wheel itself.
1. Pull the negative cable off the battery and wait a full 10 minutes before proceeding.
2. Peel back the steering column shroud. Most shrouds are held by two to four Phillips screws on the underside. Separate the upper and lower halves by working them apart from the seam.
3. Locate the cruise control stalk or combination switch assembly. Before touching any wiring, study how the harness routes through the column shroud so you can replicate the path on reassembly.
4. Back out the fasteners that hold the switch to the column shaft collar. On most vehicles this is two or three Phillips screws, but some assemblies use a Torx head, so check before reaching for the screwdriver.
5. Slide the switch assembly forward off the steering shaft. Do not yank it. The wiring harness feeds through the column and may have limited slack.
6. Release the electrical connector. Squeeze tabs require thumb pressure on the tab while pulling the connector body straight back. Locking slides need to be pushed forward before the connector separates.
7. Thread the new switch harness through the column shroud following the same path as the original. Seat the connector until it locks, then tug once to confirm it will not back out.
8. Feed the new switch assembly back onto the shaft, seat it against the collar, and thread the fasteners in by hand first before snugging them down. Avoid over-torquing, which can crack plastic collars.
9. Refit the column shroud halves. Start at the seam nearest the dash and work toward the steering wheel, pressing each clip in before moving to the next.
10. Reattach the negative battery cable and take the vehicle on a short road test. Verify each cruise function: on, set, resume, coast, and cancel before returning to normal driving.
Tip: Photograph the wiring routing before you disconnect anything. It takes five seconds and saves significant frustration during reassembly.
OEM vs. Aftermarket: What to Buy and What to Skip
OEM switches match the original part’s exact specifications, including resistance tolerances the vehicle’s body control module was calibrated for. They typically run $40 to $120 depending on the make, but they eliminate the guesswork around signal compatibility.
Quality aftermarket brands are a solid choice for most steering-wheel button repairs. They cost less and perform reliably when sourced from reputable suppliers.
Skip this:
• No-name switches from marketplace listings without a brand or warranty. Budget units often fail within months and can generate persistent fault codes that outlast the switch itself.
• Pull-out switches from salvage yards. Contact wear is not visible on inspection, and a used switch that worked last week in a wreck may have already degraded past the point of reliable operation.
When the clock spring is also due for replacement, the calculus changes. Theclock spring sits in the airbag circuit, so resistance tolerances matter for deployment timing. Use OEM or OEM-equivalent for that component. The cruise switch itself carries no airbag load and is fair game for a quality aftermarket option.
Buying Online: Where to Find the Best Deals
Online pricing for cruise control switches typically runs 40 to 70 percent below what a dealer parts counter charges for the same component. The real risk with buying online is fitment. A switch ordered without vehicle verification often arrives incorrectly and has to be returned.
CarParts.com organizes itscruise control switch catalog by year, make, and model, so OE-grade parts surface at the top of results for your specific vehicle.
Before placing an order, confirm the return window. A 30-day or longer no-hassle return policy matters here because fitment issues sometimes only appear at installation, not on the product page.
What to Do If the New Switch Does Not Fix the Problem
A correctly installed switch that still leaves cruise inoperative points to a fault upstream or downstream of the switch. Work through these in order:
• Run another OBD-II scan. New codes sometimes set themselves during the repair process. TheP0571 code, for instance, points directly at the brake switch cancellation circuit rather than the cruise switch itself.
• Put the brake pedal to the floor and have someone standing behind the vehicle confirm both brake lights fire fully and stay lit. An intermittent brake light signal will keep cruise locked out regardless of the switch condition.
• Monitor livespeed sensor data. The PCM needs a stable, continuous speed signal before it will allow cruise engagement. An erratic VSS reading prevents cruise from holding speed even when every other component tests good.
• Squeeze the horn. If horn output has dropped or gone intermittent since the repair, the clock spring may have been disturbed during reassembly and needs inspection.
When the problem survives multiple part replacements, the likely culprits are the cruise control module, the body control module, or a partial break somewhere in the wiring harness between them. Tracing those faults requires a factory-level scan tool and wiring diagrams specific to the vehicle. At that point, a professional diagnosis is faster and cheaper than further parts swapping.
Keep Reading: Related Posts


Any information provided on this Website is for informational purposes only and is not intended to replace consultation with a professional mechanic. The accuracy and timeliness of the information may change from the time of publication.


