Replacing a floor pan in a car means cutting out the rusted section, fitting a new metal panel, welding it in place, then sealing and priming it to keep moisture out. It’s one of the most common sheetmetal repairs on older vehicles, and while it takes patience, it’s well within reach for a careful DIYer with the right tools. The core sequence stays the same on almost any car: remove what’s rotten, prep clean bare metal, fit the replacement, weld, then protect both sides of the repair.
Key Takeaways
- Cut out all rust first. A new panel welded over compromised metal will rust again, so remove every bit of corrosion before fitting anything.
- Follow the vehicle manufacturer’s repair procedure when choosing a joint. Butt, lap, or backed butt joints may be specified depending on the vehicle and repair location, and structural floor sectioning should not be improvised without an approved procedure.
- Use the corrosion-protection products specified for the vehicle and repair. Where permitted, weld-through primer can be applied to mating surfaces before welding to help protect areas that will become inaccessible.
- Seal both sides. Seam seal and prime the topside and underside, then add sound deadener and undercoating to lock moisture out.
- Mind the structure. On unibody cars the floor carries load, so don’t cut more than you must at once and brace the body if needed.
What a Floor Pan Does and Why It Rots
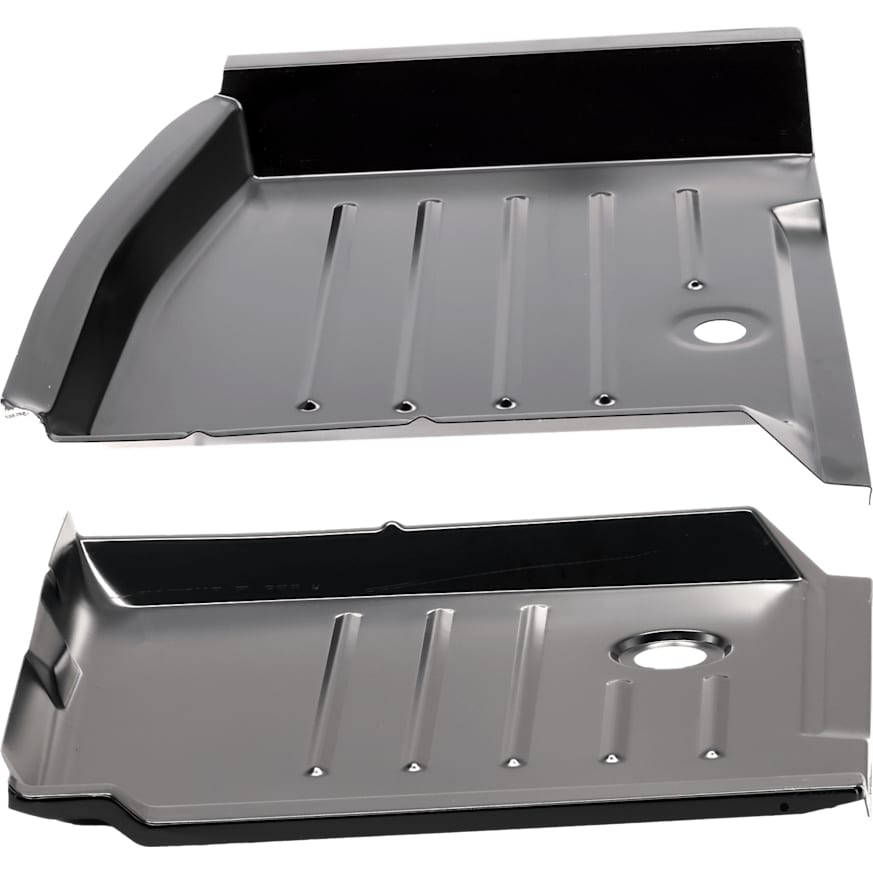
The floor pan is the large stamped metal sheet that forms the bottom of the passenger compartment. It carries seat mounts, supports occupants, and on unibody vehicles contributes to the car’s structural stiffness. Because it sits low and traps water from leaks, wet shoes, and failed seals, it’s one of the first areas to corrode.
Rust usually starts where moisture collects: under carpet, near the rocker panels, and around heater cores that leak coolant. Left alone, surface rust eats through the metal and weakens the structure. That’s why car floor repair almost always starts with finding the moisture source, not just the hole. A common culprit is a leaking windscreen seal, which lets water run down into the floor and quietly rust it from above. If you catch corrosion early, you may be able to stop rust without welding, but once it eats through the metal, a panel swap is the only durable fix.
How Battery Placement Can Accelerate Floor Pan Corrosion
First and foremost, vehicles that live in icy regions where a lot of road salt is used are among the most prone to rust, and the floor pan isn’t the only part of the vehicle that suffers. Old Volkswagen Beetles and some other vehicles with batteries mounted low in the passenger compartment can develop weak and rusty sheet metal in that area as well.
The classic air-cooled Volkswagen Beetle is a well-known example. Its battery sits under the rear seat, and leaking electrolyte can corrode the floor pan beneath it.
Anytime a manufacturer places a lead-acid battery over painted sheet metal inside the cabin or trunk, leakage or poor venting can damage nearby metal, especially if moisture and road salt are also present. Battery placement by itself does not cause rust, but it can create a concentrated corrosion risk when electrolyte or acidic vapor reaches the body.
Other verified examples of low, cabin-mounted batteries include the 2000-2005 Buick LeSabre, which places the battery under the rear seat, and the Jeep Grand Cherokee WK2, which places the battery under the front passenger seat.
Tools and Materials You’ll Need
You don’t need a full body shop, but quality consumables make a real difference. Plan to gather the following:
- A MIG welder suited to thin sheet metal, ideally with easy-grind or low-carbon wire that’s easier to hammer and dolly flat.
- Cutoff wheels and grinding discs. Fresh, quality discs cut fast and cool, which matters because heat warps thin metal.
- A replacement panel, either a stamped pan made for your vehicle or flat sheet you shape yourself.
- Weld-through primer, epoxy primer, seam sealer, and undercoating for protecting the repair.
- Basic hand tools: clamps, a hammer and dolly set, marker, and measuring tape.
A thin, consistent gap between the old and new metal makes butt welding far easier, so don’t rush the cutting and fitting stage.
Step by Step: Replacing the Panel
Remove the Old Metal
Strip out the seats, carpet, and trim so you can see the full extent of the damage. Mark a clean cutting line in solid metal beyond the rust, then cut out the rotten section with a cutoff wheel. Disassembling carefully and reversing that order on reassembly keeps the job organized.
Prep and Treat Bare Metal
Grind back to clean, bright steel around the repair area. If any rust remains and you can’t cut it out, treat it with a rust converter, but cutting it out is always the better fix. Prepare mating surfaces using the corrosion-protection products and procedures specified by the vehicle manufacturer. Where permitted, apply weld-through primer before welding so corrosion protection remains in areas that will become inaccessible.
Fit the New Panel
Position the replacement and trim it to leave a small, even gap for butt welding, or an overlap if you’re lap welding. For structural repairs, follow the vehicle manufacturer’s procedure for the required joint design, overlap dimension, and attachment method. A 50 mm dimension appears in some OEM procedures, but it is not a universal rule for floor-pan repairs. Clamp everything tightly so nothing shifts while you tack.
Weld It In
Start with spaced tack welds to hold position and spread heat, then fill in gradually, skipping around to avoid warping. A butt weld can provide a clean, flush repair, while a lap joint can be more forgiving to fit and weld. For structural floor sections, however, the correct joint is the one specified by the vehicle manufacturer. Take your time, because heat is the enemy of flat sheet metal. The same patient approach applies whether you’re patching a pan or repairing auto body rust holes elsewhere on the car.

Pro Tips are nuggets of information direct from ASE-certified automobile technicians working with CarParts.com, which may include unique, personal insights based on their years of experience working in the automotive industry. These can help you make more informed decisions about your car.
Pro Tip: Remember to clamp the welding work clamp to clean metal as close as practical to the area you're welding, preferably on the same panel. Keeping the welding-current path short reduces the risk of current or voltage spikes damaging electronic controllers. Disconnect and isolate both battery cables before welding, and follow the vehicle manufacturer's welding precautions for nearby control modules and high-voltage systems.
Finish and Protect
Grind welds smooth, then seam seal the joints on both the top and underside. Prime with epoxy, then add sound deadener inside and undercoating beneath. If you’re unsure which protective coating to reach for, this breakdown of rust proofing vs undercoating explains what each does. Sealing thoroughly is what keeps the repair from rusting through again.
A Note on Safety
The floor pan is part of your vehicle’s structure, so treat the repair seriously. Don’t remove large sections at once on a unibody car without bracing the body, or it can flex and lose alignment. For a structural passenger-compartment floor, check the vehicle manufacturer’s repair information before sectioning. If no approved sectioning procedure exists for the area you’re repairing, don’t improvise one.
Welding near fuel lines, brake lines, or the tank calls for extra caution: disconnect the battery, keep a fire extinguisher handy, and move or shield anything flammable. If you’re unsure whether the surrounding structure is sound, have a qualified shop inspect it before you drive the car, since a weakened floor affects how it holds up in a collision.
FAQ
For a single pan, expect a full weekend or more as a beginner. Cutting and fitting carefully takes longer than the welding itself, and rushing tends to create warping and gaps you’ll fight later.
You can, but it won’t last. Rust spreads under anything you cover it with, so welding a new panel over rotten metal just hides the problem until it returns. Cutting back to clean steel is the only durable approach.
Neither joint is universally correct for every floor-pan repair. Butt welding produces a flush joint, while lap welding is generally easier to fit and can be specified for some repairs. On structural sections, use the joint type, overlap, weld pattern, and attachment method called for by the vehicle manufacturer’s repair procedure.
Yes. Moisture attacks from both directions, so sealing only the topside leaves the underside exposed. Seam seal and undercoat the bottom to protect the weld fully.
Trapped moisture, usually from wet carpet, failed door or window seals, or a leaking windscreen. A leaking heater core location under the dash can also drip coolant onto the floor. Find and fix the leak, or the new pan will eventually rot too. Following a few tips to deal with rust on the rest of the body helps keep new corrosion from starting.
Drive On a Floor You Can Trust
A solid floor is the foundation of a safe, rust-free ride, and doing the job right means your repair will outlast the rest of your vehicle. Once the metal is sealed, a set of fresh floor mats helps trap the wet shoes and spills that started the problem in the first place. Take your time with the cutting, welding, and sealing, and you’ll end up with durable metal. When you’re ready to source replacement floor pans, primers, and the right consumables, CarParts.com has the parts to get you there.
Keep Reading: Related Posts




Any information provided on this Website is for informational purposes only and is not intended to replace consultation with a professional mechanic. The accuracy and timeliness of the information may change from the time of publication.