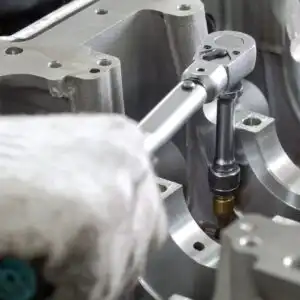
To use a torque wrench, set the tool to the manufacturer’s specified torque value, snug the fastener first, then apply smooth and steady force until the wrench signals the target torque, and stop immediately. Done correctly, you get the right clamp load without stretched studs, warped parts, or stripped threads.
How to use a torque wrench properly
A torque wrench is a finishing tool, not a brute-force tightener. The reliable method is to prep the threads, pre-tighten by hand, then torque in a controlled pull until the wrench signals that you have reached the target setting.
Pro Tips are nuggets of information direct from ASE-certified automobile technicians working with CarParts.com, which may include unique, personal insights based on their years of experience working in the automotive industry. These can help you make more informed decisions about your car.
Pro Tip: If you lubricate the threads, you will get more clamping force even with the same torque reading. More clamping force is not always a good thing.
Lubrication is beneficial when the manufacturer explicitly calls for it, such as:
- Engine fasteners with specified oil or moly lube instructions
- Certain aftermarket performance fasteners that come with their own lube and torque charts
- Suspension bolts that require anti-seize
- Spark plugs in aluminum heads, depending on manufacturer guidance
Lubrication is not appropriate when the torque spec assumes dry threads, such as:
- Most wheel lug nuts and bolts
- Structural bolts
- Fasteners where over-clamping can distort components
The key is matching the torque method to the engineering intent. Torque is just a proxy for clamping force. Friction is a variable many people do not consider. Thread prep is how you control friction. The torque wrench is how you finish the job consistently.
There are click-type torque wrenches, dial-type torque wrenches, and digital torque wrenches with indicator lights and displays that tell you when you are approaching the target torque while setting up the wrench. There are also torque wrenches and angle gauges for torque-to-yield bolts, where you tighten to an initial torque and then turn the fastener an additional specified angle to achieve the required bolt stretch.
Torque wrenches can range from inexpensive to very expensive, depending on your budget.
Tools and setup you should have ready
- Torque spec for the exact fastener and condition, whether dry or lubricated, and whether the hardware is new or reused
- Correct-drive torque wrench and matching socket
- Ratchet or breaker bar for removal and pre-tightening
- Wire brush and thread chaser as needed for dirty or damaged threads
- Light source so you can keep the socket fully seated and the wrench properly aligned
Numbered steps
- Find the correct torque spec and confirm the conditions. Torque values are not universal. Wheel hardware torque is typically specified for clean, dry threads and clean seating surfaces, unless the service information says otherwise. Some aftermarket shop manuals have typos, so if you are tightening a small fastener and the manual says 100 foot-pounds when it should be 100 inch-pounds, verify the torque spec from a second reliable source.
- Pick a wrench that places your target torque within its accurate working range. If the target torque falls near the minimum or maximum of the tool, switch to a better-sized wrench so the reading is more trustworthy. Use the appropriate size torque wrench. A 1/2-inch-drive torque wrench usually will not be as accurate on lower settings as a 3/8-inch-drive torque wrench.
- Inspect and prep the fastener and threads. Clean grit and corrosion from threads and mating surfaces. Dirty or damaged threads can create false torque, where you feel resistance but are not actually building clamp load. In a blind hole, such as with certain head bolt holes, make sure there is no liquid in the bottom of the hole. Liquid will not compress, and you may reach your torque reading without achieving the intended clamping force.
- Install the socket fully and align the wrench. Keep the wrench square to the fastener so you are not side-loading the socket or universal joint.
- Pre-tighten without the torque wrench. Thread the fastener by hand until seated, then snug it with a ratchet. If the fastener will not thread smoothly by hand, stop and correct the issue before torquing.
- Set the torque value and lock it. Dial in the setting carefully in the correct units, then lock it so the value cannot drift while you work.
- Apply torque with one continuous pull at the marked grip area. Pull smoothly without jerking. Keep your hand where the handle is designed to be held, since grip position affects lever length and accuracy.
- Stop immediately at the signal. When the wrench clicks, beeps, or otherwise indicates the target torque, stop pulling. Do not confirm the reading with extra clicks, because the fastener can continue tightening even after the signal.
- For multiple fasteners, torque in stages and in sequence. Bring all fasteners to a lower torque stage first, then proceed to the final torque. Follow the specified pattern for parts like wheels, intake manifolds, and cylinder heads to prevent distortion.
- Reset and store after the job. Back the wrench down to its lowest calibrated setting before storage, keep it clean, and return it to its case. This applies to click-type torque wrenches. If you do not do this, the internal spring can lose tension over time and the wrench can become inaccurate.
Quick type-specific notes
- With a click torque wrench, the click is your stop point. If it clicks immediately with almost no movement, the fastener is already at or above the set torque. In that case, back off, snug it correctly, and torque again.
- With an electronic model, trust the alert only after you have confirmed the unit selection and any tolerance settings you enabled.
- With a beam wrench, keep your eye square to the scale to avoid parallax error, and read the pointer while the fastener is still moving.

What torque wrenches are used for on a vehicle
Torque wrenches are used for any joint where the correct clamp load matters for safety, sealing, or long-term durability. In practical terms, they help prevent both loose assemblies and over-stressed fasteners.
Common automotive uses
- Wheel lug nuts or lug bolts after brake work, tire rotation, or wheel swaps. This is better than relying on an impact wrench alone. Lug nut threads can stretch and gall when overtightened, and rotors can also warp. For wheel-specific guidance, see right torque for lug nuts.
- Brake calipers, caliper bracket bolts, caliper slide pins when specified, and wheel hub hardware
- Engine components such as spark plugs, valve cover gaskets, oil pan bolts, intake manifold bolts, and cylinder head fasteners, which often require staged and sequenced tightening. For plug-specific guidance, see this spark plug torque chart.
- Suspension hardware including strut-to-knuckle bolts, control arms, and axle nuts, many of which call for high torque or a torque-plus-angle procedure
- Driveline and chassis fasteners where vibration can loosen hardware over time
Decision point that saves headaches
- If the service procedure specifies torque plus angle or calls for new torque-to-yield bolts, follow that procedure exactly. A torque wrench alone is not a substitute for the full process.
Choosing the right torque wrench range and style for the job
The best wrench is the one that matches your torque range and the available access while keeping accuracy realistic. A beam-style wrench is simple and durable, while a dial or electronic option can be easier to read for small fasteners and quality checks.
Pick your torque range first
- For low-torque fasteners and small hardware, an inch-pound torque wrench keeps you in a usable scale where small differences matter.
- For mid-range automotive work, a 3/8-inch- or 1/2-inch-drive wrench covers most underhood and chassis fasteners, as long as the wrench range matches the spec.
- For high-torque work, axle nuts and some suspension hardware may require a higher-capacity wrench or a torque multiplier.
Style choices, in plain terms
- A manual torque wrench refers to a non-electronic tool. It is dependable, but you must read the scale carefully and use consistent technique.
- Budget tools can work well if they are handled carefully and checked periodically. Accuracy depends on the tool’s condition and calibration.
- Access and ergonomics matter as well. For tight spaces, a compact head and clearly marked handle can reduce mistakes.
Setting torque correctly and reading the scale without guessing
Correct setup is where many torquing errors begin. The operating instructions for your specific model matter because the lock, direction switch, scale, and minimum setting rules vary from tool to tool.
Numbered steps for setting and verifying before the pull
- Select the correct unit. Confirm whether you are working in foot-pounds, inch-pounds, or newton-meters. Do not assume the tool remembers your last selection after a battery change.
- Set the value precisely. On micrometer-style handles, align the main scale and the rotating scale carefully, then lock the handle.
- Confirm the wrench direction. Many click wrenches are designed to measure accurately in one direction only, unless the tool is marked otherwise.
- Keep your technique consistent. Pull with steady force, keep the handle in line with the wrench body, and avoid using your body weight in a sudden drop.
- Use the right reference for specs. For wheels, the vehicle owner’s documentation is the primary source. For repair work, use OEM service information. If a generic torque wrench guide conflicts with a vehicle service spec, the service spec takes priority.
Warning: Do not lubricate wheel lug hardware unless the vehicle or wheel manufacturer explicitly calls for it. Lubrication changes friction and can lead to over-torquing even when the wrench reads the correct number.
Torque wrench attachments, adapters, and socket choices that change the result
Attachments are sometimes necessary for access, but some of them change the effective lever length and therefore the torque being delivered. The safest approach is to keep extensions inline whenever possible and be deliberate about angles when you must use adapters.
What to use with torque wrenches and sockets
- Use the correct drive-size socket for the wrench.
- Use a high-quality, tight-fitting socket to reduce the chance of rounding fasteners.
- Avoid stacking wobble extensions, universal joints, and adapters unless access truly requires it.
- If you use impact tools during wheel work, understand what torque sticks can and cannot do before you rely on them.
Common add-ons
- Straight drive extensions for reach
- Universal joints or wobble extensions for angled access
- Crowfoot wrenches for line and flare nuts
- Torque adapters for digital readout, which are helpful for auditing torque but still depend on good technique
When the setting changes
| Setup | Does the torque setting change? | What to do |
| Straight extension inline with the drive | Usually no | Set torque to the spec and torque normally |
| Crowfoot at a right angle to the wrench handle | No | Keep it at 90 degrees and torque normally |
| Crowfoot inline with the wrench handle | Yes | Reduce the wrench setting using the length-based correction method |
How to correct for an inline crowfoot, in plain terms
- Measure the effective length of the torque wrench from the drive center to your hand position.
- Measure the added length from the drive center to the fastener center with the crowfoot in line.
- Set the wrench to the desired fastener torque multiplied by the wrench length, then divide by the combined length.
Common mistakes, symptoms, and quick fixes
Most torque problems show up as something that just feels off, and that instinct is worth paying attention to. Recognizing common failure modes and correcting your setup before continuing is the fastest way to avoid parts swapping later.
| Symptom | Likely cause | Quick fix |
| Click happens immediately with almost no movement | Fastener is already over spec, or the wrong units were set | Back off, confirm units, snug properly, then re-torque |
| You hit the torque but the joint loosens later | Dirty threads, wrong sequence, or clamp surfaces not properly seated | Clean threads, torque in stages and in the correct pattern, then recheck seating |
| Studs or bolts stretch, snap, or threads strip | Over-torque from extra clicks, lubrication mismatch, or wrong spec | Replace damaged hardware, correct thread condition, and torque once to spec |
| Wrench feels inconsistent or does not signal | Tool needs service, has been dropped, or was stored while loaded | Stop using it for critical fasteners and have it checked |
Example scenario
After finishing a front brake job and reinstalling the wheels, start each lug nut by hand until fully seated, then snug them in a star pattern with a ratchet. Torque in the same star pattern to the specified value using smooth, continuous pulls. If one lug clicks instantly at the set torque, do not keep clicking. Loosen that lug, snug it again, and torque it once more so the final reading reflects actual movement and clamp load. After driving a short distance, many tire manufacturers and installers recommend a re-torque check, often after about 50 to 100 miles.
Care, storage, and calibration so the wrench stays trustworthy
A torque wrench is a measuring instrument, and accuracy requires maintenance. Treat the tool like a gauge rather than a breaker bar, and you will avoid drift and false readings.
Best practices
- Never use a torque wrench to loosen fasteners.
- Avoid dropping the tool or using it as a pry bar.
- Store it at the lowest calibrated setting, not below the minimum on the scale.
- Keep the handle clean and dry so your grip does not slip mid-pull.
- Calibrate based on use and the risk involved. Many guidelines reference a yearly interval or roughly 5,000 cycles, with more frequent checks for safety-critical work.
- If you need a refresher on tool care, see recalibrate a torque wrench.
Pro Tips are nuggets of information direct from ASE-certified automobile technicians working with CarParts.com, which may include unique, personal insights based on their years of experience working in the automotive industry. These can help you make more informed decisions about your car.
Pro Tip: Reality check: Even a budget torque wrench can stay accurate if it is stored correctly and checked periodically. A neglected wrench, on the other hand, can drift if it is left loaded or abused. Technique and care matter just as much as the price tag.
Keep Reading: Related Posts


Any information provided on this Website is for informational purposes only and is not intended to replace consultation with a professional mechanic. The accuracy and timeliness of the information may change from the time of publication.