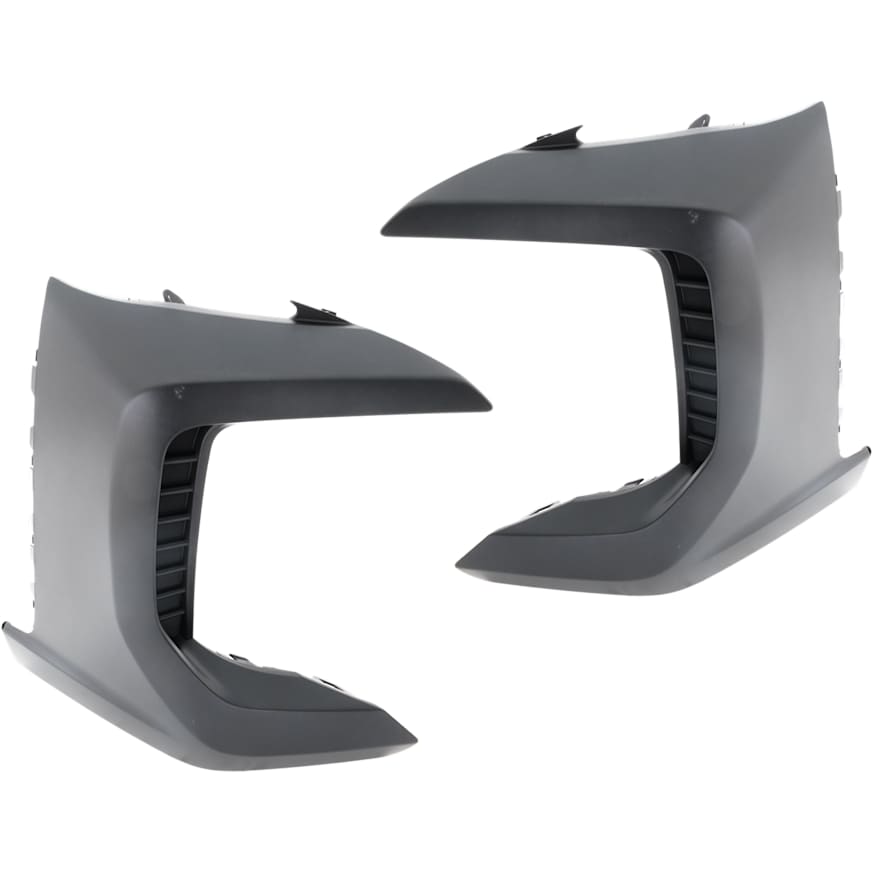
When you start shopping for replacement exterior parts, you’ll notice something interesting. The left and right corners get listed separately from the center section. Those corner pieces are your bumper ends, and they sit right where your bumper meets the fender and wheel opening. Corners take a beating in daily driving, so picking the right replacement saves you time, prevents you from doing the same repair twice, and keeps your vehicle looking sharp and aligned.
Key Takeaways
- Bumper ends are the corner sections that connect your bumper to your fenders, and they take the most abuse from parking and low-speed contact
- You can often replace just the damaged corner instead of the entire bumper assembly, which saves money and simplifies the repair
- Matching your vehicle’s exact trim level, sensor layout, and feature configuration prevents ordering mistakes and returns
What Are Bumper Ends?
Bumper ends are the corner sections at the left and right edges of your bumper system. Some vehicles mold the corner right into a single bumper cover, so you can’t buy the bumper end separately. Other vehicles treat the corner as its own part that bolts or clips on, kind of like an end cap. You might also see the corner listed as a bumper extension piece when the center section stays put, and the corner completes the body line.
Bumper ends matter because they sit at a transition point where alignment jumps out at you. When a corner sits even slightly out of place, you’ll see the gap where the bumper meets the fender. You might also notice looseness near the wheel well liner. That makes bumper ends a common focus for repairs after a parking lot tap or repeated scrapes.
Parts catalogs don’t always use the same labels, so you want to match the listing to what your vehicle actually uses. Some vehicles list a corner as the bumper end, while others list a corner as part of a bumper cover or as a separate extension that completes the shape. The safest approach is to match the position and the feature layout, then confirm whether the part description treats the corner as a standalone piece or part of a larger assembly.
Signs Your Bumper Ends Need Attention
Bumper ends can show wear through visible cracks, but they can also show issues through fit changes at the fender line. A growing gap at the bumper-to-fender seam points to loosened mounts or shifted supports. A corner that sits lower than the center section can indicate hardware that no longer holds tension. When you press on a corner, and it moves more than the opposite side, the corner likely needs a closer look at fasteners and bracket engagement.
If your vehicle uses sensors or reflectors in the corner, watch for changes in how those pieces sit. A sensor that appears tilted or recessed can signal a mounting issue behind the fascia. Also check wheel clearance at full steering lock when a front corner looks shifted, because the liner and corner edge should sit consistently on both sides.
Note: If you have parking sensors, check how the sensor sits in the corner. Consistent seating helps the sensor mount cleanly and keeps the corner looking uniform.
When Should You Repair Or Replace Your Bumper Ends
You can address many corner issues without replacing the entire bumper assembly, but the right choice depends on mounting integrity and alignment.
When Repair Makes Sense
Repair tends to work well when the damage stays on the surface, and the corner still holds alignment. If the bumper end sits flush, the panel gap stays even, and the mounting points remain intact, refinishing and minor surface repair often restore appearance without changing parts.
When Replacement Makes Sense
Replacement makes more sense when you need reliable mounting and a consistent fit. Cracks that reach mounting points, broken tabs, or a corner that won’t stay seated usually call for a new bumper end or the correct corner-related service part. If your vehicle has corner sensors, reflectors, or integrated trim, replacement can also help you restore clean, consistent seating for those components.
Note: Test fitting still matters with any replacement part. It lets you confirm alignment before you invest in paint or additional trim pieces.
Fitment Checks That Prevent Returns And Rework
Most ordering mistakes happen because trims and features change bumper corner shapes. Confirming details up front saves time and prevents mismatches.
Vehicle And Trim Identification
Start with year, make, model, and trim level, because the same model year can carry different bumper corner designs across trims. When a seller offers VIN-based fitment, use it. It helps narrow down option packages that change corner geometry.
Position And Side Confirmation
Confirm whether you need a front or rear corner, then confirm left or right. Many listings use driver-side and passenger-side labels, so match those to the side of the vehicle when you’re seated in the driver’s seat. Also, confirm whether the corner is the full bumper cover corner area or a smaller extension piece.
Feature Layout Matching
Match the feature layout to your vehicle’s configuration. Parking sensors, tow hooks, recovery points, appearance packages, and exhaust cutouts can change the shape and openings at the corners. Lighting and reflector differences can also shift mounting points or require specific sub-trims.
Finish And Paint Readiness
Confirm whether the part arrives primed for paint, textured black, or plated. If you plan to paint, a test fit before painting keeps the process smooth and reduces rework at the body shop.
Tip: If you plan to paint, do the test fit first. You’ll avoid delays, and you’ll keep the paint process straightforward.
Typical Price Ranges And What Drives Cost
Pricing changes by vehicle type, finish, and whether you choose OEM or aftermarket. Aftermarket bumper ends cost around $25 to $180 per corner, depending on finish and complexity.
OEM corner pieces often cost more, especially on trucks and SUVs with plated finishes, step surfaces, or complex trim integration.
Paint and materials can add meaningful cost, and that amount shifts by region, color, and blending needs. Small hardware items can also add up, but they often improve alignment and reduce installation time.
Note: Fresh mounting hardware often helps you restore alignment faster and keep the corner seated consistently over time.
How To Choose Aftermarket Parts With Confidence
Aftermarket bumper end corners can be a cost-effective option when you confirm fitment details up front and test fit before paint. Precise vehicle matching, feature alignment, and complete included hardware help the part install cleanly and sit flush.
Sensor-ready corners work well when the opening layout and mounting style match your vehicle’s sensor design. Confirm sensor count and style, then verify whether the part includes bezels or brackets, or whether you’ll transfer them from your original corner.
Corners with multiple sub-trims install smoothly when the listing clearly states what gets included. Confirm whether inserts, reflectors, bezels, and step pads come with the part or whether you’ll reuse existing pieces, then stage everything before you start the install.
Installation Steps And Mistakes To Avoid
Many bumper end replacements are approachable if you work slowly and support the corner as you release fasteners. Use a deliberate order so you don’t stress tabs or misalign the corner during reassembly.
Follow these steps:
- Park on level ground and protect nearby edges with painter’s tape.
- Turn the steering wheel to open access to the wheel well fasteners.
- Remove or loosen the wheel well liner fasteners to expose the corner mounts.
- Remove the underside fasteners next, then any top-edge fasteners the design uses.
- Support the corner with one hand while you release clips with the other.
- Inspect brackets and attachment points, then replace any worn hardware.
- Test fit the new corner and check gaps to the fender and liner.
- Transfer any components such as reflectors, bezels, or sensor mounts as needed.
- Install fasteners loosely, align the corner, then tighten evenly.
- Verify sensor seating, trim alignment, and wheel clearance at full lock.
Tools You’ll Need For A Smooth Installation
Having the right tools on hand makes the job go faster and helps you avoid damaging parts during removal and installation. Here’s what you should gather before you start working on your bumper ends.
Trim Clip Removal Tool
A trim clip tool helps you lift retainers without chewing up plastic edges. It also helps you work in tight wheel well spaces where a screwdriver can slip and scratch paint or distort clips.
Ratchet, Sockets, And Drivers
A small ratchet and the correct sockets speed up fastener removal and reduce the chance of rounding bolt heads. Keep common drivers ready, including Phillips, flat, and any Torx bits your vehicle uses, so you can remove the liner and bracket fasteners without improvising.
Painter’s Tape For Edge Protection
Painter’s tape protects adjacent paint edges while you pull the bumper end away from the fender line. It also helps prevent tool marks when you work around reflectors, bezels, and trim.
Replacement Clips And Screws Matched To Your Vehicle
New clips and screws help the corner hold tension and align consistently. Matching the clip type to your vehicle matters because clip length and head shape affect how the bumper edge sits along the wheel well liner and underside.
Tip: Warm plastic seats more easily. If temperatures are low, let the part reach room temperature before installation.
Keep Reading: Related Posts


Any information provided on this Website is for informational purposes only and is not intended to replace consultation with a professional mechanic. The accuracy and timeliness of the information may change from the time of publication.


