Getting inside a car door isn’t complicated, but it does punish impatience. Whether it’s a blown speaker, a sluggish window regulator, or a busted door lock actuator, everything behind that panel requires removing it first. Using the wrong tool turns a straightforward job into a collection of snapped clips and scratched trim.
What Tool to Use to Remove the Door Trim Panel
A trim panel removal tool is the right answer on panels with “Christmas tree” style clips like the one shown below. These tools are sometimes called panel pry tools or trim poppers, and they’re specifically shaped to slip into the gap between the door panel and the door shell. The wide, tapered tip spreads the load across the clip instead of concentrating it in one spot, which is what keeps plastic from cracking.
A flathead screwdriver will technically pop clips, but it’s also good at gouging trim and scuffing the painted metal edge of the door. Nylon pry tools flex slightly under load, so they seat cleanly against each clip location without tearing the mounting point. They’re inexpensive and the difference in results shows up from the very first clip.
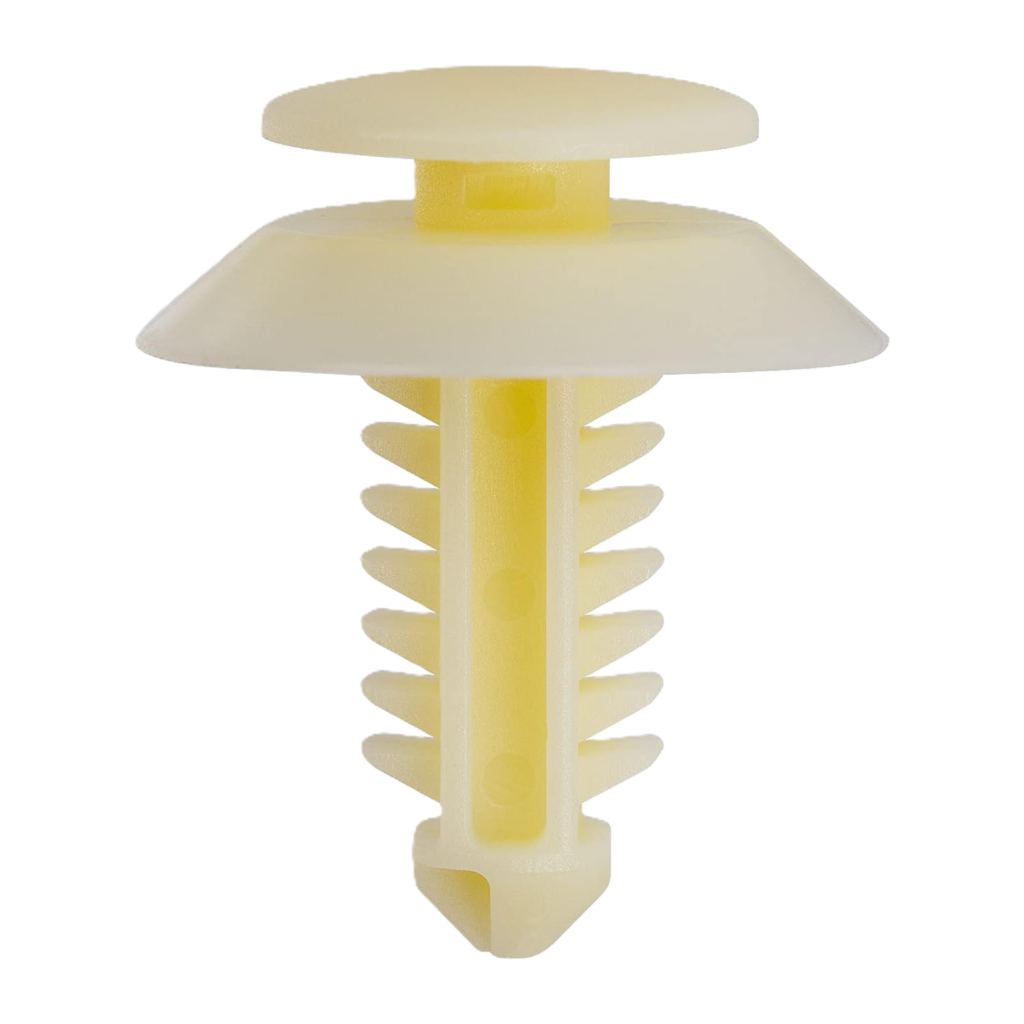
Most kits include several tool profiles because different vehicles and different areas of the same door need different approaches. A wide flat wedge works well along the bottom edge. A hook or J-style tool reaches tighter spots near the top of the panel. Fork-style clip removers handle the stubborn ones without bending the clip ears off the door shell.
The Full Toolkit for Door Panel Removal
Screwdrivers and Bits
Before touching the panel, remove every fastener hiding around it. Phillips and flat-head screwdrivers handle most of them, but Torx bits are increasingly common on late-model domestic vehicles and are standard on most European makes. The required Torx sizes vary by vehicle, so check the removal instructions before choosing your bits. Missing a single hidden screw is the most common reason a panel won’t budge, so a flashlight isn’t optional.
Screw locations vary by vehicle, but check inside the door pull cup, underneath the armrest, behind any push-in plastic cap near the window switch, and under the inner door handle trim. Running through each spot before pulling on the panel saves a lot of frustration.
Pliers, a Flashlight, and a Parts Tray
Once the panel is loose, wiring connectors need to come off before it’s fully free. Needle-nose pliers help with cables and connectors that are too stiff or awkward to release by hand. Use them only where appropriate to release a retainer or latch, not to pull on wires or force a connector apart. A magnetic parts tray keeps screws and clips organized by location so reassembly doesn’t turn into a guessing game.
Should You Buy a Kit or Individual Tools?
Entry-level trim removal kits with five to eight pieces handle most domestic and Japanese vehicles without issues. A full kit in the 12 to 19 piece range adds spring-loaded clip pliers, fork-style clip extractors, and may include connector-release tools, which is worth it if door panel work comes up more than once.
When evaluating a kit, look for nylon or glass-filled nylon construction over ABS plastic. Nylon flexes under load instead of snapping, which is the whole point of using a dedicated trim tool. Kits with a variety of tool profiles are worth more than kits that pad the piece count with identical shapes. A carry case is a practical bonus.
Here are the tool types worth having in a complete kit:
- Wide flat wedge: entry point along the panel bottom and sides
- Hook or J-style lever: for tight spots near the top of the panel
- Angled pry tool: for working around the armrest and door pull
- Fork-style clip remover: for stubborn or recessed clips
- Clip pliers (larger kits): for spring-loaded panel clips
- Connector-release tools: for releasing connector latches where access is limited. Terminal release picks remove individual terminals from connector housings and generally aren’t needed for routine door panel removal.
Is It Worth Buying Trim Removal Tools Online?
Online pricing on trim removal tools beats local retail by a meaningful margin. A solid five-piece plastic pry kit often runs eight to ten dollars online versus fifteen or more at a parts counter. Full kits in the 12 to 19 piece range that would run forty dollars or more in a store regularly land under twenty online. These are universal tools, so there’s no fitment concern when buying aftermarket.
Aftermarket trim removal kits perform on par with professional-grade tools in most DIY applications, and material quality is the real differentiator. Nylon and glass-filled nylon hold up under repeated use, where cheaper plastics won’t. Skip any kit that doesn’t list materials or bundles trim tools with unrelated hardware to inflate the piece count.
CarParts.com carries a solid selection of trim panel removal tools, including kits and individual tools from established aftermarket manufacturers. Orders may arrive in as fast as two business days, depending on availability and destination. Check the estimated delivery date for your order.

How to Remove a Door Trim Panel Step by Step
Before You Begin: Check How Your Door Panel Is Attached
To begin with, you need to know how the door panel comes off. Don’t assume all door panels come off the same way, because they don’t. Some door panels have a couple of screws at the bottom that may be hidden in the carpeted part of the panel. On some vehicles, when you remove those screws, the panel simply lifts, with hooks on the panel coming out of the square holes cut for those hooks.
You may need to remove the grab handles, screws in the armrests and the armrests themselves, the power window switch panel, the rubber weatherstrip at the top of the panel, the triangular panel that hides the mirror screws, and the door handle cover. Again, the procedure varies by vehicle, so research the way your door panel comes off before you even begin.
General Door Trim Panel Removal Steps
Use your vehicle’s service instructions to determine the removal sequence. Some panels use push-in clips, some use molded hooks, and others combine different retainers. Do not pry outward on a panel that must slide upward to release its hooks.
- Turn off the ignition and disconnect the negative battery terminal according to the vehicle’s service instructions. Power door locks and window motors can have live circuits inside the door. If the door contains an airbag or other supplemental restraint system components, follow the specified disabling procedure and wait the manufacturer’s required time before disturbing their connectors. Disconnecting the battery does not immediately discharge the system’s reserve power.
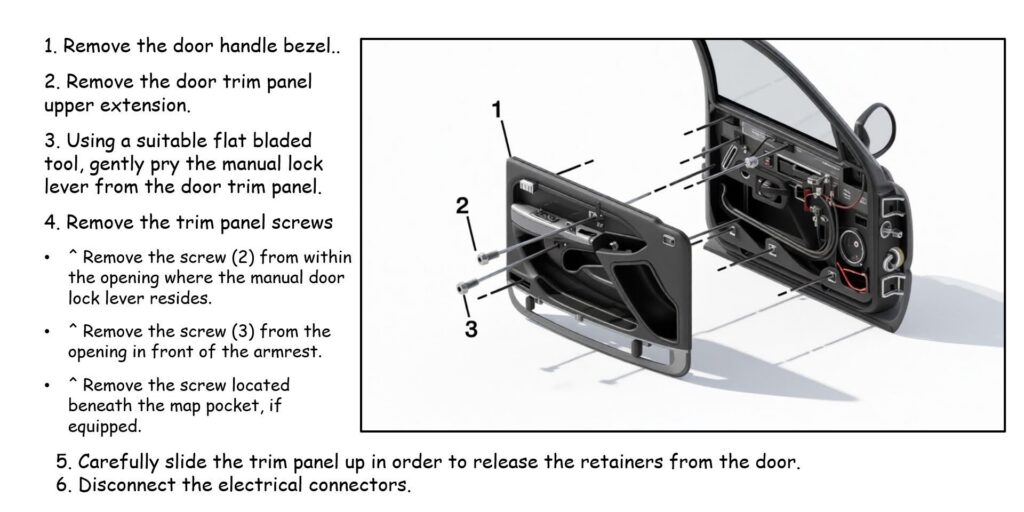
- Remove the door handle trim piece. It usually clips off or conceals one last screw underneath. Remove any other trim pieces specified in the vehicle’s instructions, such as the upper extension or manual lock lever shown in the example below.
- Remove every screw securing the panel, including hidden fasteners. Check the door pull cup, armrest underside, window switch bezel, and any push-in plastic caps. Torx screws are common on European and late-model vehicles.
- If the panel uses push-in clips, insert the appropriate trim removal tool near a clip at the starting location specified in the service instructions, often along the bottom edge. If the panel is secured by lift-off hooks instead, skip the clip-prying steps.
- Rock the tool gently instead of forcing it. Walk each clip free from its retaining hole and listen for the pop before moving to the next.
- For panels with push-in clips, work around the clipped edges one clip at a time, following the vehicle’s specified sequence. Stop if the panel resists; check for a missed fastener or a retainer that releases in a different direction.
- Lift or slide the panel in the direction specified for your vehicle. On the hook-mounted panel shown below, slide it upward after removing the screws to release the retainers. On many clip-mounted panels, lifting follows clip release and clears the upper edge from the window opening.
- Disconnect the wiring harness connectors for the window switch, speaker, and any lighting before setting the panel aside. Press each release tab and pull from the plastic housing, not the wires. Release any door handle cables or rods as required, supporting the panel so it does not hang from its wiring or linkages. Some connectors must be disconnected earlier in the removal sequence, so follow the service instructions.
Tip: Set the removed panel clip-side up on a clean surface. Resting it face-down on concrete scuffs the vinyl and can crack the backing.
Example: Removing a Lift-Off Door Trim Panel
Look at this example. The instructions show the door handle bezel, upper extension, and manual lock lever being removed before the screws. Once the screws are out, the panel slides upward to release its retainers, and the electrical connectors are disconnected. This sequence applies to the door design shown; it is not a universal procedure for every vehicle.
What to Check Before Putting the Panel Back On
Even a careful removal breaks a clip or two, especially on higher-mileage vehicles where the plastic has stiffened over time. A broken clip reinstalled in its socket will rattle within weeks and can prevent the panel from sitting flush along the door edge. Inspect every clip before reinstalling and replace any that snapped or show a cracked ear.
Door panel clips are inexpensive and vehicle-specific, so confirm year, make, and model before ordering to get the right diameter and depth.
Also, check the vapor barrier before the panel goes back on. That thin plastic sheet taped to the inner door shell keeps water from the window seals out of the panel backing. A torn barrier leads to soft spots and warping over time. If it’s intact, press the tape back down around the edges. If it’s torn, seal it with butyl tape before reinstalling. If the panel itself is warped or cracked, it may be time to look at a door trim panel replacement instead.
Replacement clips and trim panel removal tools are both easy to find at CarParts.com. Having the right clips on hand before starting saves a trip mid-job. And once the panel is back on, keeping door panels clean helps them stay looking right and lasting longer.
Keep Reading: Related Posts






Any information provided on this Website is for informational purposes only and is not intended to replace consultation with a professional mechanic. The accuracy and timeliness of the information may change from the time of publication.