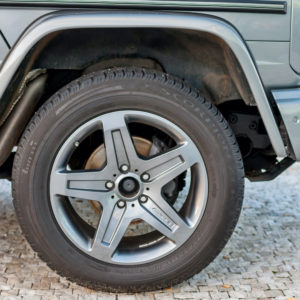
If you’ve upgraded to bigger tires or just want your truck or SUV to look more aggressive, fender flares are probably on your to-do list. They’re not just about customizing how your vehicle looks. These accessories protect your body from rocks, mud, and road debris that your tires kick up.
The good news? Installing fender flares is totally doable for most people, even if you’re not a gearhead. Knowing how to install fender flares yourself can also save you some coin.
Things to Remember Before the Install
Before grabbing your tools, you should know that not all fender flares are installed the same way.
Bolt-on flares are the most secure option. You’ll drill holes (or use existing ones) and fasten them with screws or bolts. They stay put through anything.
Clip-on flares snap into factory mounting points, which means no drilling. They’re easier to install, but these might not work for all vehicles.
Adhesive flares use heavy-duty tape to stick directly to your fender. Perfect if you want to avoid making holes in your truck, though you’ll need to put extra care into surface prep.
How to Install a Fender Flare: A Hands-On Guide
Here’s what you’ll need for most installations:
What You’ll Need:
- Soap and water
- Degreaser or isopropyl alcohol
- Power drill (with various bit sizes)
- Screwdriver or socket set
- A torque wrench (if your kit indicates specific torque settings)
- Rubber or edge trim/seals
- Sealant or silicone
- Automotive adhesive (as needed)
- Fender flare kit (some items may need to be added or eliminated from this list based on your kit inclusions)
Here’s how to get it done:
1. Prep your workspace
Make sure your vehicle is parked on level ground and engage the parking brake.
2. Clean everything thoroughly
Wash the fender thoroughly with soap and water. Remove any wax, dirt, or oil residue on the surface by wiping it down with a degreaser or isopropyl alcohol.
3. Test the fit and mark your mounting points
Don’t drill anything yet. Hold the fender flare up against the fender to see how it lines up. Align the contours, and use some painter’s tape to mark roughly where the fasteners or edges will sit. Center punch your marks, so the drill bit stays where it needs to.
4. Drill carefully (if needed)
If your kit requires drilling, start with a smaller bit to drill the pilot hole and work your way up to the right drill size. Take it slow, and clean up any rough edges with sandpaper or a deburring tool. Treat any bare metal with rust inhibitor.
5. Add edge trim
Consider adding a rubber or vinyl seal along the flare’s inner edge to prevent the edges from scratching the body panel. Aside from cushoning vibration, this also helps hide minor imperfections.
6. Install the flares
For bolt-on flares: Line up your holes and insert the hardware. Don’t tighten everything all at once. Gradually tighten each fastener in a pattern (like you would lug nuts), going back and forth. This keeps the pressure even and prevents the panel from warping.
For clip-on flares: Simply align the clips with their mounting points and press firmly until you hear or feel them snap into place.
For combination systems: Follow the adhesive steps first, then add your bolts or clips for extra security.
7. Tighten everything
If your kit came with torque specifications, now’s the time to use them. Over-tightening can crack plastic flares, while under-tightening means they’ll vibrate loose.
8. Seal and protect
Run a thin bead of automotive silicone sealant around any drilled holes or edges where water might sneak in. Touch up any exposed metal with paint or additional rust inhibitor. Wipe away fingerprints and any excess adhesive with alcohol.
9. Final checks
Take your time and follow the same process for each wheel well. Keep comparing side-to-side to maintain symmetry. After everything’s installed, check that your flares don’t interfere with your suspension or rub against your tires when you turn.
How to Install Fender Flares Without Drilling
Not everyone wants to poke holes into their ride. Plenty of kits use automotive-grade adhesive tape. It’s quicker and reversible, but it only works if you prep the surface properly.
- Wipe down the fender until it’s spotless.
- Peel the backing tape, position the flare carefully, then press firmly for 30-60 seconds along the entire length.
- Some installers recommend applying pressure with your palm while moving along the flare.
- Adding a few clips or brackets can give you extra security.
Just know that adhesive isn’t as tough as bolts. For normal driving, you can expect the tape to hold up fine. But if you’re bouncing through trails, bolted flares tend to stay put better.
Picking the Right Flares
Not all fender flares are made equal. ABS plastic is common because it’s flexible and resists impact. Polyurethane takes hits even better but costs more. Fiberglass looks sharp and can be shaped, but it can be brittle when struck hard.
The right material for you will depend on your driving style and frequent driving conditions. A city truck might do fine with fiberglass, while an off-road rig may benefit from tougher ABS or polyurethane fender flares.
Finding the right fit matters just as much as choosing the best material. Some kits are molded for specific model years, while others claim a universal fit. Unless you’re comfortable trimming or modifying body panels, stick with vehicle-specific kits.
When to Replace Fender Flares
Even good flares don’t last forever. Sun exposure, mud, and constant vibration can cause cracks or warping over time. If you notice gaps forming between the flare and fender, or if the hardware looks loose, it’s probably time to swap them out.
Other situations call for replacement, too. If you’ve upgraded to larger tires, your old flares might not cover enough tread. Maybe you’re tired of the style and want to switch from smooth OEM-look flares to a riveted pocket style. Whatever the reason, swapping them is usually no harder than the first install.
How Much Will New Fender Flares Cost?
So, how much does it cost to get fender flares installed? Flare kits run anywhere from $100 to $500. Labor adds another $100 to $200. This brings your total in the range of $200 to upwards of $700 if paint or rust repair is needed.
Aside from the flare kit, you might spend $50 to $200 on supplies like drill bits, adhesive tape, or touch-up paint. That said, many people on truck and repair forums report finishing the job with nothing more than the hardware included in the kit.
Common Mistakes During Installation
Avoid these common mistakes, so you don’t end up wasting your time and money.
Drilling Right Away
One of the biggest mistakes people make is skipping the test fit. Holding the flare in place before drilling or peeling adhesive reveals alignment issues early, saving you from frustration later.
Leaving Holes Prone to Rust and Water Damage
Failing to seal every hole and edge with rust inhibitor or sealant can shave years off the life of your install due to water and rust damage.
Close small gaps between the flare and the body with a strip of rubber trim or weatherstripping. This will leave you with a cleaner look, and protect your fender’s paint from being rubbed away over time.
Rushing While Tightening Hardware
Tightening the bolts or screws haphazardly can pull the flare out of shape. Don’t crank down one side all at once. Work slowly from one end of the panel to the other, gradually tightening as you go. This will leave the panel snug against the body with even pressure.
Forgetting to Check Your Work
Some fasteners can become loose due to vibration after the first few drives. Take a few minutes to go over each flare with a screwdriver or socket after a week of driving.
Working in Extreme Temperatures
Temperature affects the process more than most people think. Cold weather makes plastic harder to flex and adhesives less sticky. Warm conditions allow the flares to bend slightly into shape and help the tape or glue bond more firmly.
Throwing Away Your Spare Bolts and Screws
Clips and screws have a way of disappearing, especially if you drive off-road. Toss a few extras in the glove box or tool kit. That way, if a fastener falls out, you can replace it before the flare starts to flap or pull away.
Functional Benefits of Fender Flares
- Fender flares offer functional protection and aesthetic enhancement, especially valuable for off-road vehicles with oversized tires.
- Fender flares shield your vehicle’s body from rocks, mud, and road spray kicked up by oversize tires, reducing paint chips, dents, and rust.
- In many states, tires must be fully covered to avoid citations. Fender flares help meet these regulations when using wider or low-offset wheels.
- If you’ve upgraded to oversized tires, flares provide the extra clearance needed to prevent rubbing during turns or suspension travel.
- In rust-prone areas, flares can conceal minor rust damage around the wheel wells, offering a cleaner look without costly repairs.
Practical Value:
- By minimizing body damage, flares can save money on paint and bodywork over time.
- A well-maintained vehicle with stylish, functional upgrades like fender flares may appeal more to buyers.
- Unlike many other upgrades that might make the vehicle ride rough or look silly, fender flares actually make a vehicle a little easier to sell and aren’t likely to be stripped away after the vehicle is bought.
Keep Reading: Related Posts


Any information provided on this Website is for informational purposes only and is not intended to replace consultation with a professional mechanic. The accuracy and timeliness of the information may change from the time of publication.