Dealer quotes for a running board motor replacement can easily hit $1,000 per side. That’s a tough number when the part itself costs a fraction of that and the job takes under two hours in a driveway. Power running boards are common on full-size trucks and SUVs, but repair procedures vary across platforms, so confirm the procedure for your specific system before tackling the job yourself. Knowing what to expect before you start is the difference between a clean afternoon and a frustrating one.
How Do You Know the Running Board Motor Has Failed?
Not every sluggish board points to a dead motor. The most common symptom is a board that deploys fine but won’t retract on its own. Binding hinges can prevent retraction even when the motor still works. Don’t push a powered board with your foot to diagnose it; follow the manufacturer’s procedure for checking linkage resistance with motor power isolated. Corroded hinge bushings create the same strain on a motor as a mechanically seized component would.
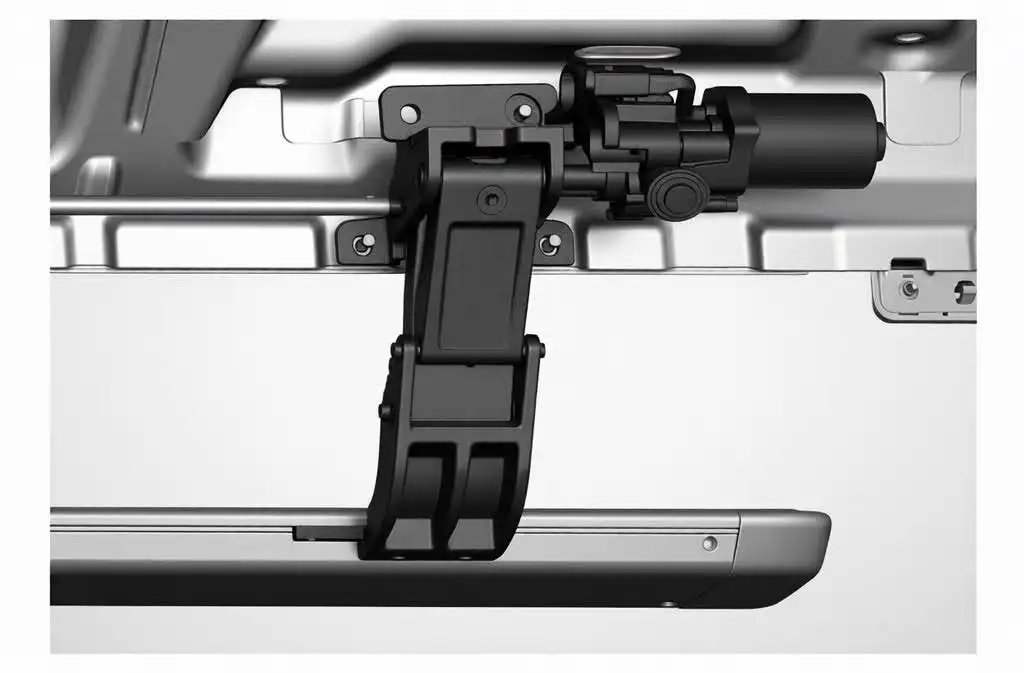
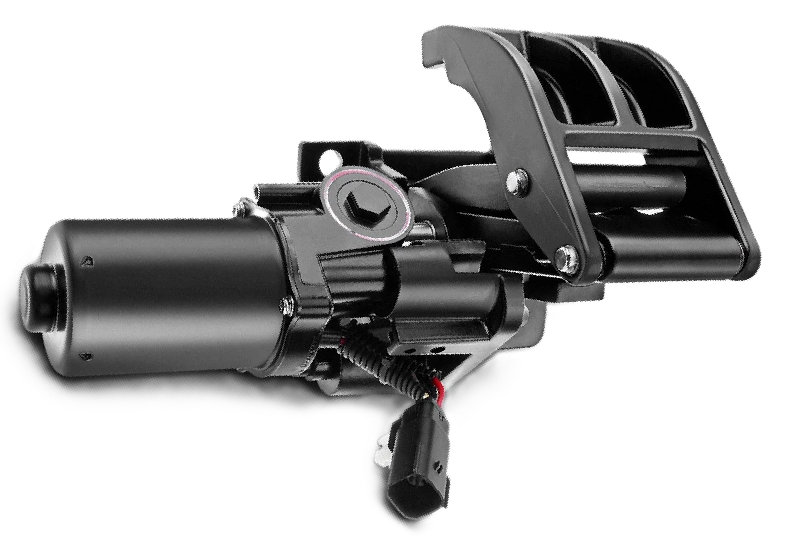
Tip: Clean the pivot points and hinge bearings, then apply the manufacturer-specified lubricant where directed. Lubricant requirements vary by system, so don’t assume penetrating oil is suitable for every running board linkage. Cycle the board with everyone clear of the mechanism before deciding the motor’s gone. A stiff hinge kills motors the same way a seized caliper kills brake pads.
Symptoms that point to the motor itself
If the board still won’t retract after cleaning and lubricating it as specified, these symptoms warrant further diagnosis but don’t confirm motor failure on their own. The board extends but won’t retract at all, or the motor makes a grinding noise without moving. There’s no motor sound at all when the door opens, or the board cycles randomly. One side works normally while the other does nothing.
A completely silent failure can result from a wiring, fuse, control-module, or motor problem. Check the fuse and connector, then follow the vehicle-specific electrical diagnostic procedure before buying a motor or pulling the board off the truck.
What You’ll Need for the Job
Most power running board motors use standard metric fasteners across Ram, Ford, and GM platforms. Depending on the assembly, you may need a 13mm socket and ratchet, a 10mm socket, and a 6mm hex wrench. Confirm the fastener types and sizes for your system, and have a torque wrench available for reassembly. Use blue threadlocker only where the service instructions specify it. Also grab penetrating oil for any corroded fasteners. Jack stands or a lift make undercarriage access much easier, and a second set of hands helps when lifting the assembly.
Note: Some platforms use Torx fasteners on the motor housing. Check a vehicle-specific forum or your service manual before you start.
Motor only or full assembly?
You can buy just the motor, or buy the motor and hinge bracket as a complete unit. On designs that use a shaft wedge lock, buying a complete assembly may avoid transferring and reseating that component. It’s a small wedge inside a tight hinge pocket, and getting it back into position without a direct sightline is what turns a straightforward swap into a drawn-out one. If the bracket is in good shape, motor-only works fine.
Does the Replacement Motor Have to Match Your Specific Model?
Yes, and this is where a lot of online purchases go wrong. Running board motor fitment isn’t universal. Connectors, shaft diameter, bracket bolt pattern, and rotation direction can all vary across model years even within the same nameplate. A motor listed for a 2017 Ford Expedition may not physically fit a 2020 of the same vehicle because the assembly changed between generations.
Before ordering, confirm the year, make, model, and trim level. Check whether the truck has a short or extended wheelbase, and verify which side needs the motor since they’re often handed. Connector shape matters too, as some motors use a round plug while others use a rectangular multi-pin.
If you can read the OEM part number off the motor label, cross-reference it against the replacement listing before paying. Aftermarket replacements from reputable suppliers are a solid option and typically come in well under OEM prices. CarParts.com lets you filter by year, make, model, and side, which takes most of the guesswork out of finding a compatible part.
How to Replace a Running Board Motor
The following outline describes assemblies with a removable motor and shaft-locking hardware. It isn’t a universal procedure for all late-model trucks and SUVs. Follow your vehicle’s service manual and the replacement manufacturer’s instructions for the mounting method, shaft alignment, and any initialization requirements. Check your service manual for torque specs specific to your vehicle.
- Park on a firm, level surface, set the parking brake, and chock the wheels. With everyone clear, use the vehicle’s controls to deploy the running board if it still operates. Disable the system and isolate its power as directed by the service manual before jacking the vehicle or working near the linkage.
- If additional clearance is needed, raise the vehicle at its approved lifting points and support it on properly rated jack stands. Don’t rely on a floor jack alone. If the board won’t deploy, follow the service procedure for accessing or releasing the assembly rather than stepping on it to force it down.
- Unplug the motor’s electrical connector before touching any fasteners. Release any connector lock or retaining tab before separating the plug. Tuck the harness clear of your work area.
- Remove the frame mounting bolts. The number and location of mounting bolts vary by assembly. Support the board from underneath before pulling the last bolt so it doesn’t drop.
- Lift the entire assembly off the frame studs and set it on a flat surface. Working on the motor with the board on the ground is much easier than reaching up under the vehicle.
- Remove the motor mounting or shaft-locking fasteners using the tool specified for your assembly. If the design includes a wedge lock, note its position and orientation before pulling anything apart. Take a photo.
- Slide the old motor off the hinge bracket. If it’s seized, use penetrating oil at the shaft interface only if permitted by the repair instructions, allow it time to work, and follow the specified release procedure rather than forcing the motor off.
- Seat the new motor onto the bracket. The shaft orientation matters. Keep the linkage in the position specified by the repair instructions and align the motor correctly. Incorrect alignment can cause binding or improper travel; shaft position alone doesn’t determine the motor’s electrical direction.
- Reinstall the wedge lock or other shaft-retaining hardware if fitted. Apply threadlocker where specified and tighten the motor and shaft-retaining fasteners to the manufacturer’s torque specifications before powered testing.
- Hang the assembly back on the frame studs. Install all mounting bolts loosely before torquing any of them. Then tighten all mounting bolts to specification before restoring power.
- Reconnect the motor connector and restore battery power if it was disconnected. Re-enable the running boards as instructed by the manufacturer. With everyone and all tools clear of the mechanism, close the door and check retraction, then open the door and check deployment. Don’t reach into the linkage while it is powered.
- Lower the vehicle and cycle the board several times through open and close. It should deploy and retract smoothly with no grinding.
If the board retracts when the door opens instead of deploying, stop testing and isolate power. Verify that the replacement motor is correct for the vehicle and side, and check its installation, wiring, and any required initialization procedure. Don’t assume that manually changing the shaft position will correct reversed operation.
Note: On GM vehicles including the Cadillac Escalade and GMC Yukon, the controls and procedures for enabling power assist steps vary by model year. If the boards don’t operate after power is restored, check the owner’s manual for the correct enable or initialization procedure rather than assuming a 10-second button hold applies.

How to Buy a Running Board Motor Online Without Wasting Money
Dealer pricing for power running board motors routinely runs $500 to $800 for the part alone. Aftermarket and remanufactured options typically land between $100 and $250, and the better aftermarket suppliers match OEM fitment standards without the markup. Quality does vary across brands, so it pays to be selective.
What to look for in a listing
Look for an exact OEM part number match or a verified cross-reference rather than a generic fitment chart entry. The listing should specify connector shape and pin count. A return window of at least 30 days is worth having in case the part doesn’t match or arrives defective. User reviews that mention your specific vehicle and trim level carry more weight than the product description.
Avoid listings with no product photos of the actual motor or no part number listed. If you’re on the fence about motor-only versus the full assembly, the next section covers that tradeoff.
Should You Replace Just the Motor or the Whole Hinge Assembly?
Motor-only replacement works fine if the hinge and bracket are in good condition. But if the bushing bores show wear, the bracket has visible corrosion damage, or the pivot pins are pitted, leaving a degraded hinge in place just delays the same failure. The hinge bushings on these systems live in the wheel well, where they take constant exposure to road spray, salt, and grit.
On trucks in northern climates, the nylon-coated steel bushings are often worn down to bare metal by the time the motor fails. A new motor fighting those same seized hinges won’t last long. While the assembly is off the truck, inspect the bushing bores and pivot pins. If there’s visible wear or significant corrosion pitting, the full assembly is the better buy.
What Keeps a Running Board Motor From Failing Prematurely?
The motor rarely fails from electrical wear on its own. The typical failure path is mechanical: corroded hinges force the motor to strain beyond its rated load until it burns out. Clean and lubricate the pivot points and hinge bearings using the products, locations, and maintenance interval specified for your system. Some systems require dry-film silicone lubricant, while others specify grease. After cleaning and applying the correct lubricant, cycle the boards with everyone clear of the mechanism to distribute it through the pivots.
Trucks in salt-belt states are at higher risk. A light coat of corrosion inhibitor on the exposed bracket hardware each fall slows the galvanic corrosion that develops where steel fasteners contact aluminum brackets, and it takes about 10 minutes to do.
Swapping a running board motor is one of those repairs that pays for itself fast, especially when you source the part at a fair price. CarParts.com carries replacement motors filtered by year, make, model, and side, so finding a compatible part is straightforward.
Keep Reading: Related Posts


Any information provided on this Website is for informational purposes only and is not intended to replace consultation with a professional mechanic. The accuracy and timeliness of the information may change from the time of publication.