
When your cabin air stops feeling truly cold, topping up refrigerant is only sometimes the answer. A modern automotive AC system is a sealed circuit; if it needs frequent top-offs, something is wearing out or leaking, and blindly adding more gas can shorten compressor life and waste money. Understanding what’s happening in the system lets you decide whether a quick recharge is reasonable or whether it is time for proper diagnosis.
Most gasoline cars that use conventional belt-driven compressors can be safely recharged at home with the right tools, but newer hybrids, EVs, and vehicles running R-1234yf have extra electrical and flammability risks that really do call for professional service. Their high-voltage compressors and special non-conductive oils mean the wrong procedure can be dangerous for both you and the vehicle.
How to Recharge AC in Car Safely, Step by Step
First off, realize that a very tiny and hard to find leak can reduce the refrigerant level to non-cooling in just a couple of days. There isn’t much refrigerant in newer systems to begin with; usually about a pound or so.
Also, if the leak is old enough, the system may have no refrigerant at all and be filled with atmosphere. In that case, a vacuum needs to be applied to the system using special tools. If you just put refrigerant into the system without pumping the air out first, the compressor will become an air compressor and system pressure will skyrocket when you try to use the A/C.
It can burst hoses and other parts. So don’t charge a system that has gone atmospheric without having the air evacuated first.
Only attempt this on a conventional ICE vehicle with no obvious major leak (oil and dye all over the condenser or lines, hissing with the engine off, etc.). If the system is empty, or the compressor never engages even briefly, skip DIY and see a shop.
1. Confirm refrigerant type and system suitability
Check the under-hood label or owner’s manual to see which refrigerant the car uses. Most 1995–mid-2010s vehicles use R-134a; many late-model cars use R-1234yf with different fittings and stricter service procedures.
- If the label mentions R-12, the system must be professionally converted; mixing R-12 with modern gases is illegal and unsafe.
- If the label shows R-1234yf, DIY charging is strongly discouraged because of its mild flammability and the need for dedicated equipment.
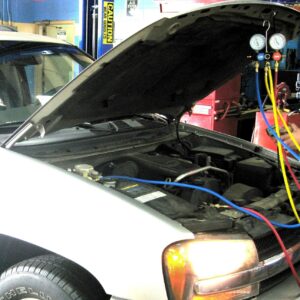
2. Gather tools and safety gear
You will need:
- DIY recharge kit matched to your refrigerant (can, hose, and gauge)
- Safety glasses and chemical-resistant gloves
- Thermometer for a dash vent
- Optional but ideal: manifold gauge set that reads both low and high side
- UV dye and lamp or soapy-water spray if you’re checking for small leaks
Work outdoors or in a very well-ventilated area. Liquid refrigerant on skin causes instant frostbite; inhaled vapor in high concentration can displace oxygen.
3. Check ambient temperature and pressure
- Make sure outside temperature is above about 55 °F; below this, pressures are misleading and the expansion valve may not behave normally.
- Start the engine, set AC to max cold, fan on high, and recirculation on.
- With your initial gauge connected to the low-side service port (the larger line, usually labeled “L”), read the pressure with the compressor running. Never attach a DIY kit to the smaller high-pressure port.
- If you don’t have a gauge, add refrigerant until the suction line (the large line from the evaporator) is cold all the way to the compressor. This way, you’ll know you have enough refrigerant, but don’t put too much or the system won’t work right. The refrigerant goes in very slowly this way, so be patient. You might even try securely connecting the refrigerant hose to the low side port with the can and hose away from moving parts and close the hood, then drive the vehicle. You’ll feel the A/C getting colder as you drive.
Compare the reading to an R-134a pressure/temperature chart like the one shown above: at roughly 75 °F, normal low-side pressure is usually around 35–45 psi, while the high side (if you’re monitoring it) often sits near 200–250 psi.
- If the gauge sits in the normal range and the air is still warm, you likely have a control, blend-door, or compressor issue rather than low charge.
- If it’s very low but not at zero, a modest recharge may restore cooling, but you should still treat that as a symptom of a leak.
4. Inspect for leaks
Before adding refrigerant, quickly inspect:
- Service ports and caps
- Hose crimps and O-ring joints
- Condenser face (stone damage)
- Evaporator drain area, if accessible
Spray soapy water on suspect areas and look for bubbles, or use UV dye and a lamp for slower leaks.
Pro Tips are nuggets of information direct from ASE-certified automobile technicians working with CarParts.com, which may include unique, personal insights based on their years of experience working in the automotive industry. These can help you make more informed decisions about your car.
Pro Tip: You may not find a leak, but the compressor is a frequent leak point so be aware of that. If the bottom of the compressor is greasy, suspect a compressor leak.
Large or oily leaks, or a system that went completely empty, need professional repair and a full evacuation, not just a refill. Shops recover and vacuum test the system before refilling to the exact weight, which is the only precise way to do a full car air conditioning refrigerant recharge.
Leak-sealer products sold in some DIY kits can swell rubber O-rings, but they also contaminate professional recovery machines and can gum up expansion valves. We generally reserve them only for last-ditch, older vehicles we’re willing to replace components on later.
5. Add refrigerant correctly
If pressures are low and no major leak is obvious:
1. Attach the kit:
- Snap the hose fitting firmly onto the low-side port.
- Keep the can upright unless your product specifies otherwise.
2. Charge in short bursts:
- With the engine and AC running on max, squeeze the trigger for 5–10 seconds.
- Gently swirl the can between bursts to keep the contents mixed.
3. Watch the gauge and vent temperature:
- Allow the pressure to stabilize after each burst.
- Stop when the low-side reading matches the chart range for your ambient temperature and the center vent air is roughly mid-30s to mid-40s °F.
Never “top off until the can is empty.” Overcharging raises head pressure, can reduce cooling, and in extreme cases can damage the compressor or burst a weak hose.
4. Finish up:
- Release the trigger, disconnect the quick-coupler, and reinstall the port cap, making sure its tiny seal is intact.
- Store the partially used can in a cool, dry place; do not vent it to the atmosphere, which is illegal in many regions.
If cooling improves but fades again within days or weeks, assume an active leak and plan for proper repair rather than repeatedly recharging the aircon system.
Pressures, Refrigerants, and Choosing the Right Freon for Car
Only use the exact refrigerant listed on the under-hood sticker—usually R-134a in older cars, or R-1234yf in newer ones. Mixing gases, or charging an R-1234yf system with cheaper R-134a, is both illegal and mechanically risky because of different chemical properties and service pressures.
That R-134a chart in your kit, or a reputable one online, is not just a suggestion; it encodes the thermodynamic relationship between temperature and saturation pressure. Comparing your gauge readings to the chart is how you distinguish a slightly low charge from an overcharged or restricted system.
Remember that hybrids and EVs often share the same service port sizes as R-134a vehicles but use high-voltage electric compressors and special non-conductive POE oils. Using conventional PAG-oil-charged equipment on them can reduce insulation resistance enough to cause compressor failure or even shock risk, which is why we leave those systems to technicians trained on high-voltage AC service.
How Often Should You Recharge a Car’s AC?
In a healthy system, you should not need to refill the car aircon on a calendar schedule. The refrigerant circulates in a closed loop and isn’t “used up”; many cars run a decade or more on the factory charge.
If you find yourself wondering how often to recharge AC in car ownership, use performance rather than time as the trigger. A gradual loss of cooling over several years can point to tiny O-ring seepage that a careful repair and recharge will fix for the long term. On the other hand, needing an AC recharge every summer signals a leak big enough that continuing to just add refrigerant risks starving the compressor of oil and causing an expensive failure.
How Long Does It Take to Recharge AC in Car?
For a straightforward job—no major leaks, normal access, and a cooperative compressor—a DIY AC recharge usually takes around 30–45 minutes. That includes checking pressures, adding refrigerant in stages, and verifying vent temperatures.
If you must spend time leak-hunting, or if the system is badly undercharged and the clutch initially refuses to engage, expect closer to an hour. A full professional evacuation, vacuum, and measured refill often lands in the same 40–50-minute window but has the advantage of precise charge weight and better diagnosis of restrictions or internal damage.
Handled this way, an AC recharge is more than just dumping gas into the low side—it becomes a controlled, data-driven checkup that keeps your system efficient and protects the expensive hardware under the hood.
Keep Reading: Related Posts


Any information provided on this Website is for informational purposes only and is not intended to replace consultation with a professional mechanic. The accuracy and timeliness of the information may change from the time of publication.


