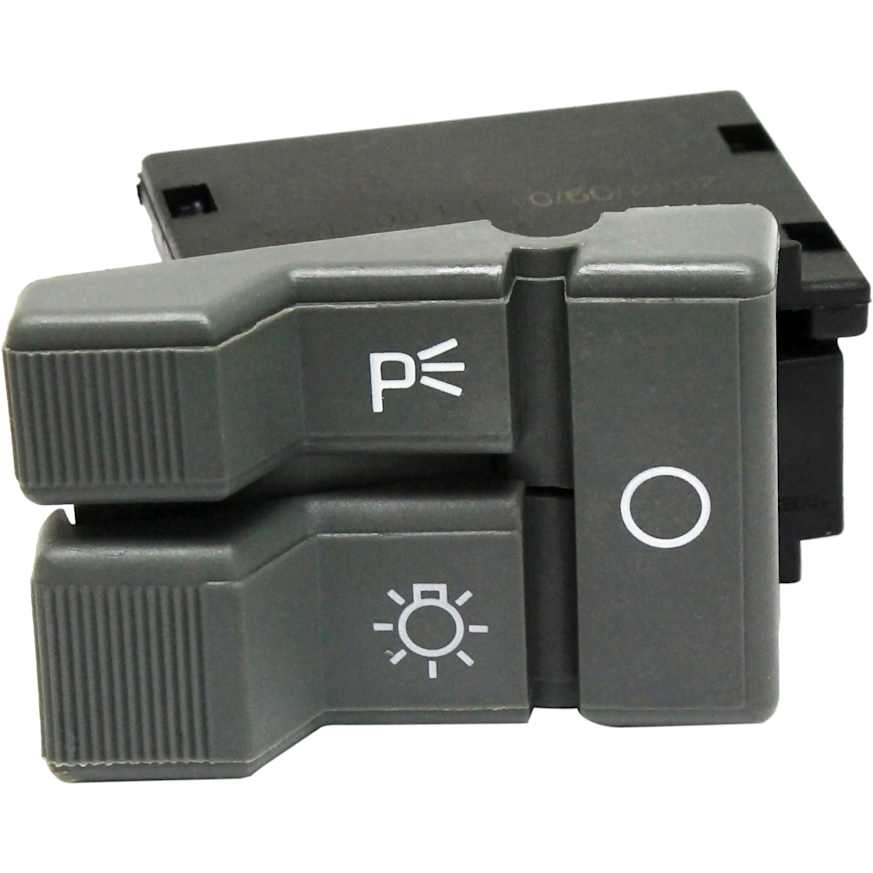
A headlight switch controls more than just the headlights. Parking lights, dash illumination, and daytime running lights all run through the same switch, so getting the diagnosis right matters just as much as knowing how to install a headlight switch properly.
A lot of vehicle owners replace the switch only to find out that the real problem was a bad connector, a blown fuse, or a failing relay. If your headlights act up intermittently, your dimmer misbehaves, or your beams only work in certain positions, slow down before ordering parts. The circuit around the switch usually tells you just as much as the switch itself.
Thankfully, this repair is possible to do on your own. Some vehicles use a simple dash-mounted pull switch, while others bundle the lighting controls into a steering column assembly. That one difference changes your whole approach, from the tools you grab to how carefully you work during reassembly.
Pro Tips are nuggets of information direct from ASE-certified automobile technicians working with CarParts.com, which may include unique, personal insights based on their years of experience working in the automotive industry. These can help you make more informed decisions about your car.
Pro Tip: The switch’s internal circuit breaker in older headlight switches can fail and cause intermittent headlight operation. If the headlight switch connector looks okay, you can replace the switch if you have this issue, since the breaker is built into the switch. If the headlight switch connector is melted, it will need to be replaced properly along with the switch.

Take It Step by Step: How to Install a Headlight Switch
This job is doable for most careful DIYers, but small mistakes early on tend to snowball. Broken trim clips, forced retaining collars, and missed connector damage are the usual reasons a repair has to be done twice.
Warning: You need to know how to remove and reinstall the switch. The job ranges from extremely easy to extremely difficult, depending on the platform.
Before anything else, set the new switch next to the old one and compare them. A mismatch in terminal layout, shaft length, or trim fit is much easier to catch on your workbench than halfway through reassembly.
- Disconnect the negative battery cable. This keeps the circuit safe while you work near live dash wiring and rules out any chance of triggering the lights during removal.
- Remove the trim bezel or panel around the switch. Use the right trim tool so you don’t scratch the dash. Some bezels unclip, while others hide screws along the cluster edge or lower dash panel.
- Release the knob and shaft if the switch uses a pull-style design. Many older switches have a small spring-loaded button on the body that needs to be pressed first. Yanking the knob without releasing it can crack the housing.
- Remove the retaining collar, trim nut, or mounting screws. Turn everything by hand first to avoid stripping plastic threads or cross-threading a trim ring.
- Unplug the electrical connector and look it over. Check for melted plastic, darkened terminals, looseness, or corrosion. A damaged connector produces the same symptoms as a failed switch, so don’t skip this step.
- Compare the old and new switch side by side. Match the plug shape, terminal count, indexing tabs, shaft style, and any dimmer or auto lamp markings. Parts that look nearly identical can still differ in ways that matter.
- Plug in the new switch and press the connector until the locking tab clicks. Align the switch squarely in the dash opening before tightening screws or reinstalling the collar.
- Reinstall the shaft, knob, and trim bezel. Make sure the clips seat evenly, and the switch face sits flush with the dash.
- Reconnect the battery and test every lighting mode. Check parking lights, low beams, high beams, dash illumination, and any automatic or daytime running light function. One working mode doesn’t confirm a clean repair.
Special Procedure for 1997 to 2003 Ford F-150 Headlight Switch

Don’t Replace Parts You Don’t Need To
Headlight problems can come from bulbs, fuses, relays, wiring, or ground connections. Replace the switch only after the symptoms clearly point that way. Replacing parts at random gets expensive fast.
Pay attention to patterns. If both low and high beams fail but the bulbs and fuse check out, the switch or relay is the likely culprit. If beam changes fail on the steering column stalk, the fault may sit in the multifunction switch, not the dash control
Pro Tips are nuggets of information direct from ASE-certified automobile technicians working with CarParts.com, which may include unique, personal insights based on their years of experience working in the automotive industry. These can help you make more informed decisions about your car.
Pro Tip: If the headlights won’t come on, try the flash-to-pass function on the multifunction switch. If they come on that way, the headlight switch or perhaps the dimmer circuit in the switch is failing, not to mention the connectors along the way.
Watch for these bad headlight switch symptoms: intermittent operation, parking lights that work while low beams don’t, a dimmer wheel that stops responding, and lights that only work when the knob sits between detents. A switch that feels hot or loose is a red flag, too.
The Connector Is Half the Story
A worn switch can overheat a terminal over time, and once the plug starts to distort, even a new switch will fail fast. Check the connector for heat damage, discolored terminals, brittle plastic, and a lock tab that no longer holds firmly. Terminal spread causes resistance, resistance generates heat, and heat kills whatever you plug in next.
If the harness side shows burning or looseness, you may need a connector repair on top of the switch swap. Replacing only the switch in that situation brings the same problem back within weeks.
Two Different Switches, Two Very Different Jobs
Not every lighting control works the same way. Older vehicles use a dash-mounted switch, while many modern vehicles fold the lighting controls into a steering column stalk. That stalk is a separate assembly with a completely different removal process.
The symptoms can sound identical even when the failed parts are different. A complaint about low beams might send you looking at the dash switch when the real fault sits inside the multifunction unit on the column. If the lighting stalk shares duties with the turn signals or wipers, confirm exactly what failed before you start pulling anything apart.
Buy the Right Part the First Time
A switch that looks right from the front can still have the wrong connector layout or internal circuitry for your vehicle. Before ordering, check whether your vehicle uses a manual switch, an integrated dimmer, auto lamp settings, or a combined control setup. Compare part numbers and fitment details, not just photos.
Shopping online gives you time to check compatibility and read feedback without anyone rushing you. When the part fits right the first time, you avoid a return, a refund, and another afternoon with the dash torn apart.
Keep Reading: Related Posts


Any information provided on this Website is for informational purposes only and is not intended to replace consultation with a professional mechanic. The accuracy and timeliness of the information may change from the time of publication.